Besides rewarding users for watching ads, Brave browser offers a slew of privacy and security features. One such feature is Brave Shields which helps block ads and trackers to enhance your browsing experience with an added layer of safety. Let us thoroughly explore what Brave Shields exactly does, how it works, and how to turn it on or off in Brave Browser.
Related | Top 20 Brave Browser Tips, Tricks, and Hidden Features (Phone, PC)
What is Brave Shields?
Browser trackers are tags on web pages that collect information about your online habits and preferences to understand your behavior online. Shields is a feature in Brave Browser that protects your privacy by ensuring your usage is harder to track from site to site.
Various websites include all kinds of trackers which can follow you across the web. Shields blocks this type of content that poses as “trackers,” keeping you safe while also speeding up your browsing experience.
Brave Shield protects the user through the following means :
- Blocksmost ads and the trackers that come with multiple websites.
- Discards cookies other than the ones from the sites that is actually bring visited.
- Makes your browser harder to recognize and follow without cookies.
- Upgrades you to secure connections as and when websited support them.
- Blocks malicious code and malicious sites.
While the default settings on Shields provide you with solid protection without making it harder to browse. Additionally, you can fine-tune settings within the Shields panel.
It is important to understand what each setting does and how it affects your browser, as some settings might increase your privacy by multiple folds but can also break the website and the way it is presented to you. Let us understand how to use these settings in the best possible way.
How to Use Brave Shields?

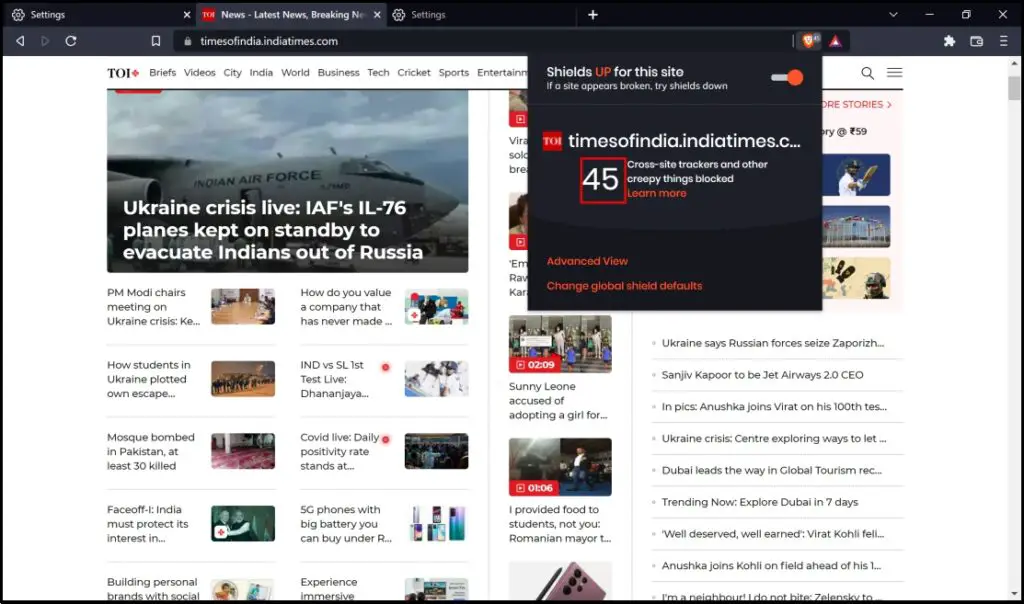
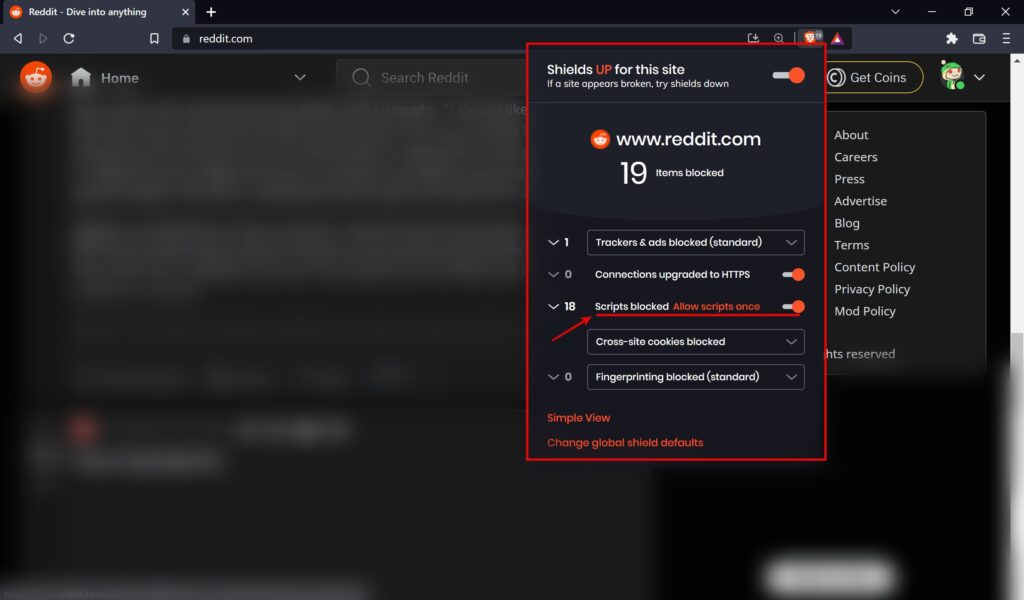
When you are browsing through a specific website, Brave Shields can be accessed on the toolbar of the top. Once you click the Brave Shields icon, you will land on the Shields menu.
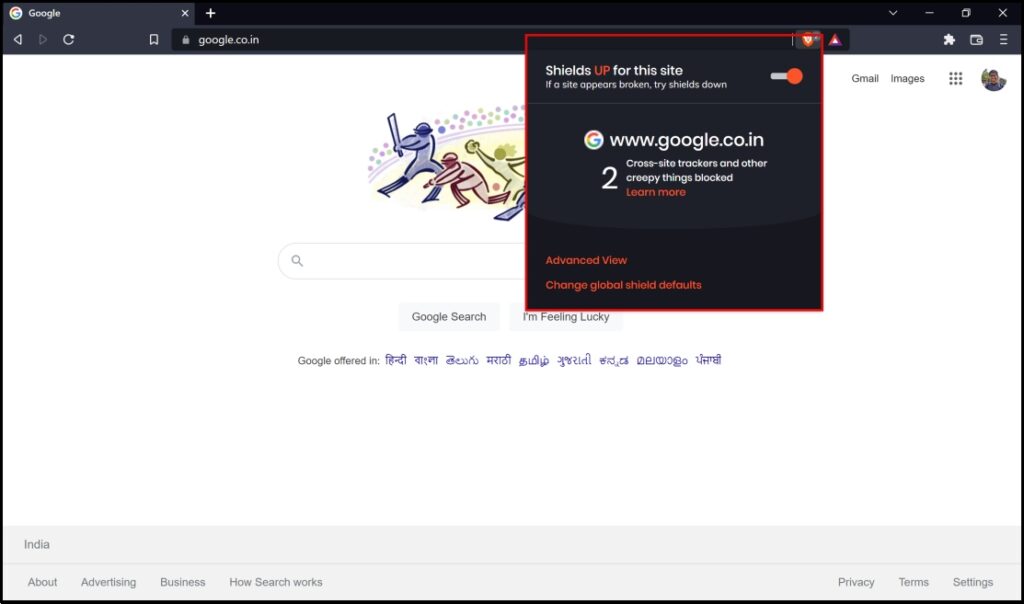
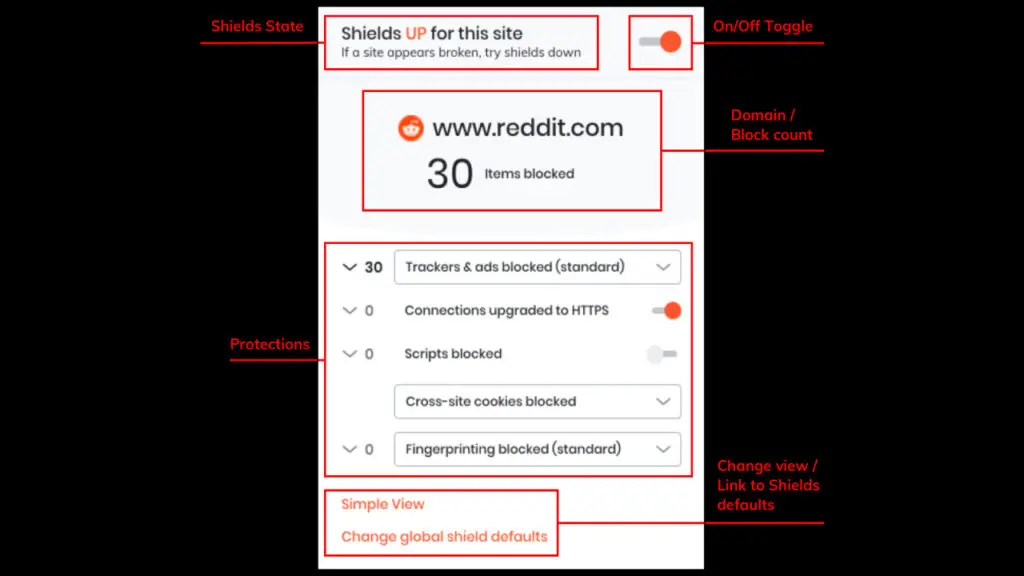
When you access the Brave Shields while on a website, you will be greeted with the default Simple View, wherein you can toggle turn off/on the Brave Shields feature and see how it is protecting you by blocking trackers.
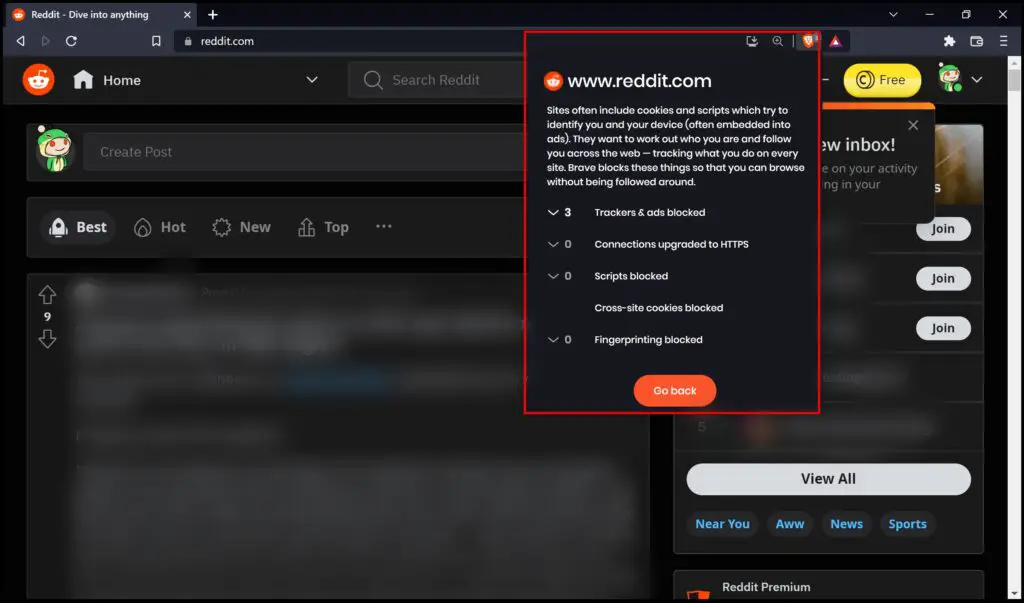
You can explore these protection features by clicking on Learn more. You can also see the advanced options by clicking Advanced view.
Understanding Brave Shields
Here’s an overview of how each feature works, and in the later sections of this article, we’ll learn how to tweak these features to meet your specific needs.
1. Trackers & Ads blocked
Brave Browser blocks all intrusive ads and trackers from every website you visit. By blocking ads and trackers, Brave significantly speeds up your experience as you browse the web. The lack of ads reduces the amount of data needed for the page, which results in a faster experience.
2. Connections Upgraded to HTTPS
HTTP is a protocol used to fetch documents over the internet, and it facilitates any data exchange on the internet. It is a non-encrypted connection which is fine for basic activities or visiting public websites that don’t require you to send any login information to it.
On the other hand, HTTPS is an encrypted connection that encrypts sensitive data that you upload online such as username and password. It prevents people from eavesdropping on the same.
The “Connections upgraded to HTTPS” upgrades connections from HTTP to HTTPS. When Shields are enabled, Brave will use an encrypted HTTPS connection on every site that supports the same.
3. Scripts Blocked
Scripts are technologies browsers use to display and render all the colorful content you see on websites. You might have come across the term “JavaScript” – it is a tool that many sites require to display all the interactive content.
Brave allows JavaScript to run by default. If you have reasons to block the website from displaying only a few forms of content, you can choose to block a few scripts. We shall explore more about blocking scripts in the following few sections.
4. Cross-Site Cookies Blocked
In this feature, Brave only accepts and allows first-party cookies and blocks others on the site. First-party cookies are directly stored by the website you are currently viewing.
These cookies facilitate website owners to collect analytics, remember language settings, and other functions to provide a good user experience.
5. Fingerprinting Blocked
Websites can identify the way your browser and device differ from other users on the internet through a combination of traits/data that is unique and exclusive to you. This activity, at times, can also take place without the use of cookies, and this process is called Fingerprinting.
When Brave Shields blocks fingerprinting, it becomes harder for websites to collect and capture data that recognizes how your device/browser is unique from the rest.
How to Change the Brave Shield Settings
For most users, the default settings on Brave Shields are enough to serve the purpose of enhancing security and privacy. But if you are well aware of the protection features of Brave Shield explained above, you can change the shield defaults.
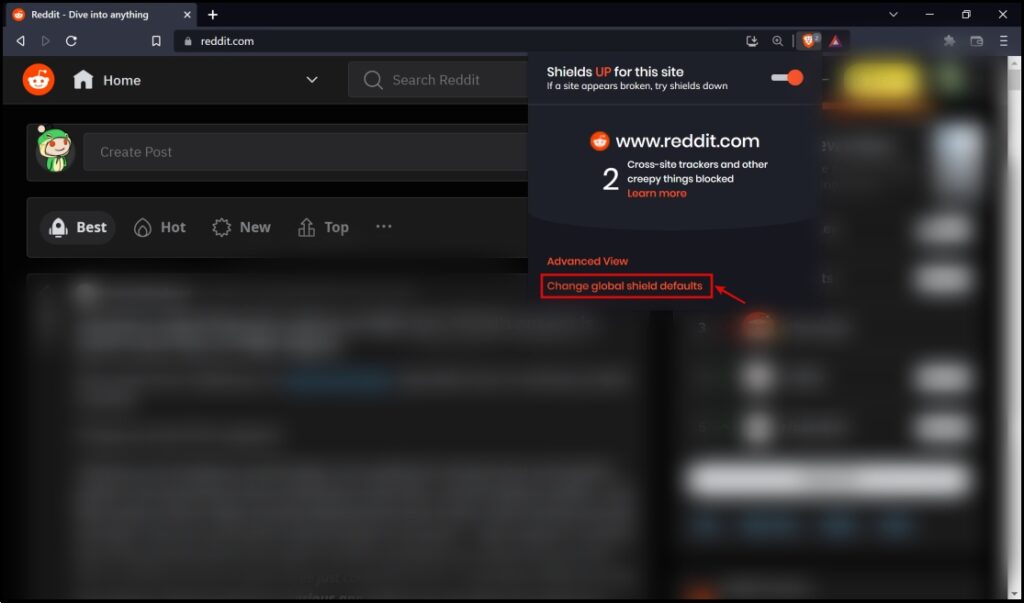
Step 1: Click on the Brave Shields logo on the website of your interest.
Step 2: Then, click on Change global shield defaults.
Alternatively, you can also land on the settings page by typing in brave://settings/shields in the address bar of Brave Browser.
Let us go through the different ways in which Brave allows us to change the default settings on Brave Shield.
1. Look and Feel
How the Brave Shields menu is presented to you can be changed using two options in the settings menu :
Show the Number of Blocked Items
By default, Brave Shield displays the number of blocked items in the menu. Turn off the toggle if you do not wish to see the same.
Change the Default View

In the previous section of the article, we went through the Simple and the Advanced View of the Brave Shields menu. You can select the default view as per your choice.
2. Trackers & Ad Blocking
By default, the Trackers & ads blocking are set to the default Standard mode. There’s also another mode called the Aggressive mode. You can switch between the modes as shown below.
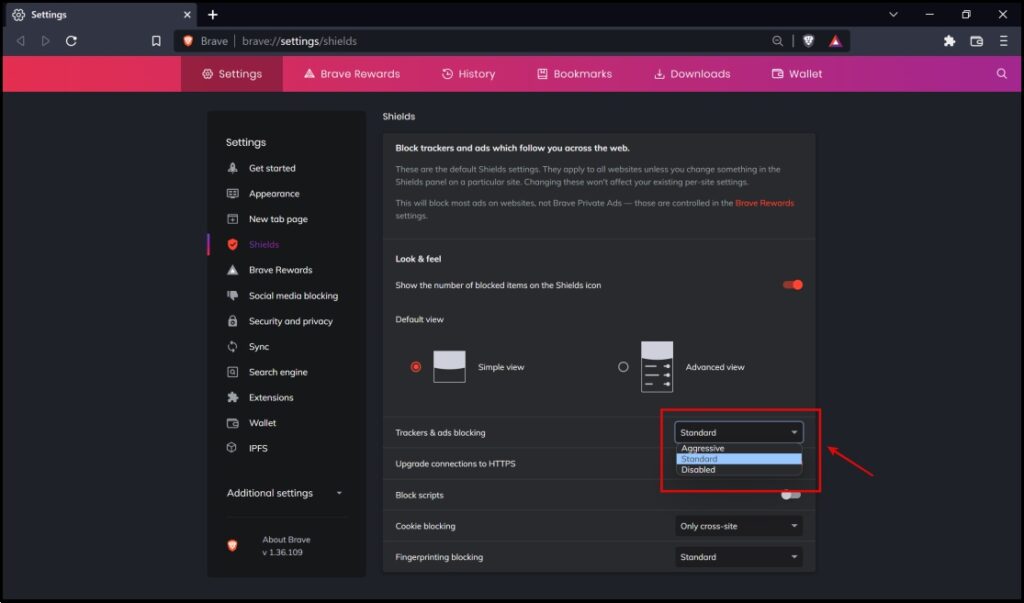
- Standard: In this mode, Brave does not block first Party ads which are a part of the sites you visit. Only those which belong to other sources on websites are blocked.
- Aggressive: Enabling this mode will block all the site ads and trackers, including the first-party ads. A disadvantage of this option is- some sites may detect features that disable first-party ads, and will not allow you to access the content unless you disable the feature.
- Disabled: This mode will disable the Trackers & ads blocking feature and will allow ads and trackers from all sources.
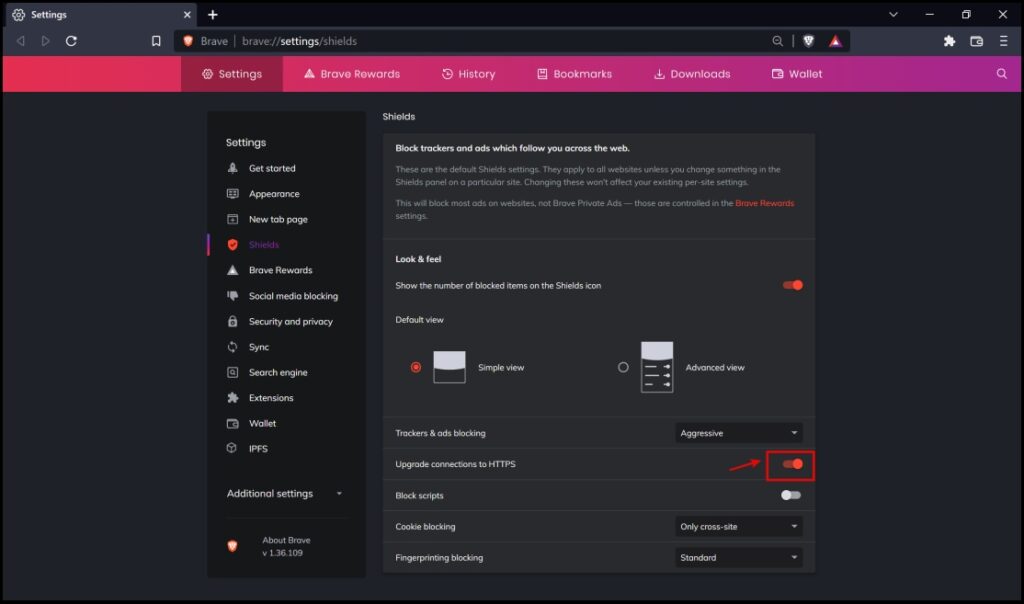
3. Upgrade Connection to HTTPS

In the previous section of this article, we went through the difference between the HTTP and the HTTPS protocol used to present websites.
As HTTPS offers encryption, Brave Shield, by default, will attempt to upgrade your connection to the same. In case, for whatever reasons you want to turn this feature off, you can turn off the toggle.
4. Block Scripts
We understood why scripts are used on a web browser in the previous section. If you have reasons to block the website from only displaying a few forms of content, you can block scripts using Brave shields.
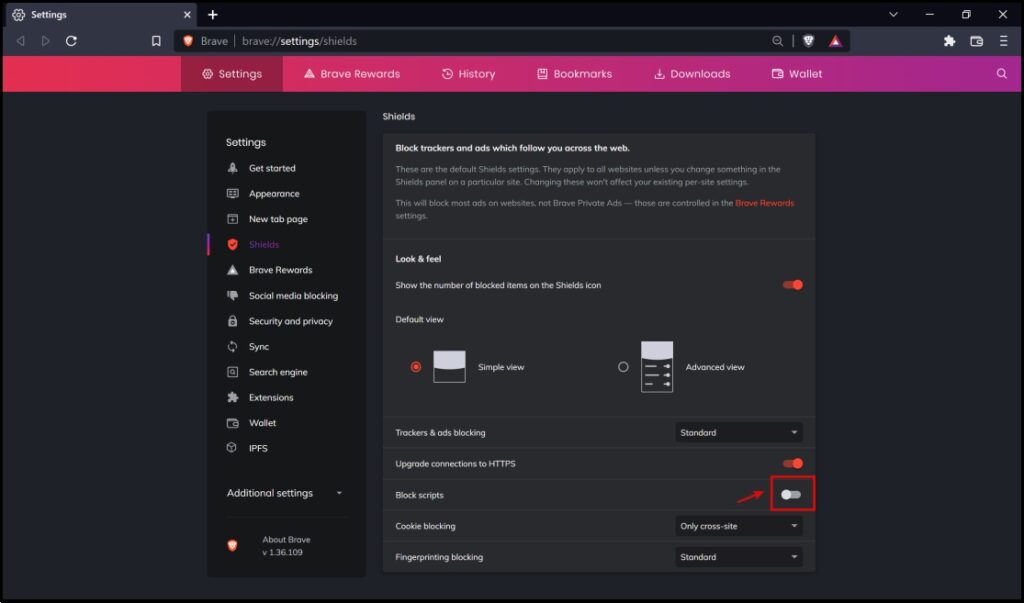
Firstly, you have to turn the toggle on, as shown in the image above. And then, you can load up a website of your choice and access the Brave Shields menu to check the number of scripts blocked.
It is recommended for most normal users to disable the feature of Block Scripts, as your website will not be able to display multimedia content like pictures and videos without such scripts.
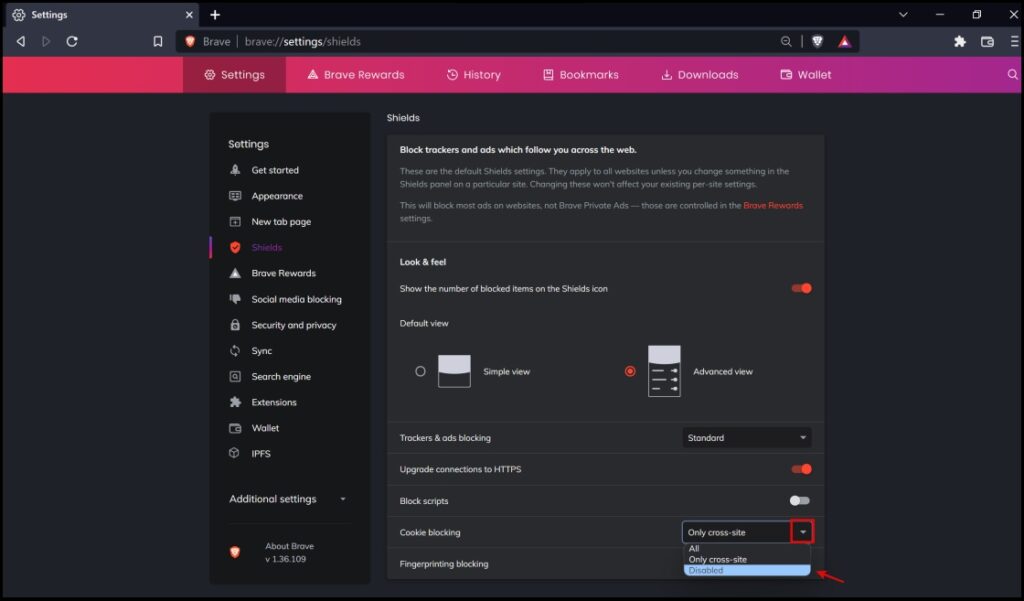
5. Cookie Blocking
Brave Shields provides you with two modes in which you can block cookies – you can either block only cross-site cookies or block all cookies.
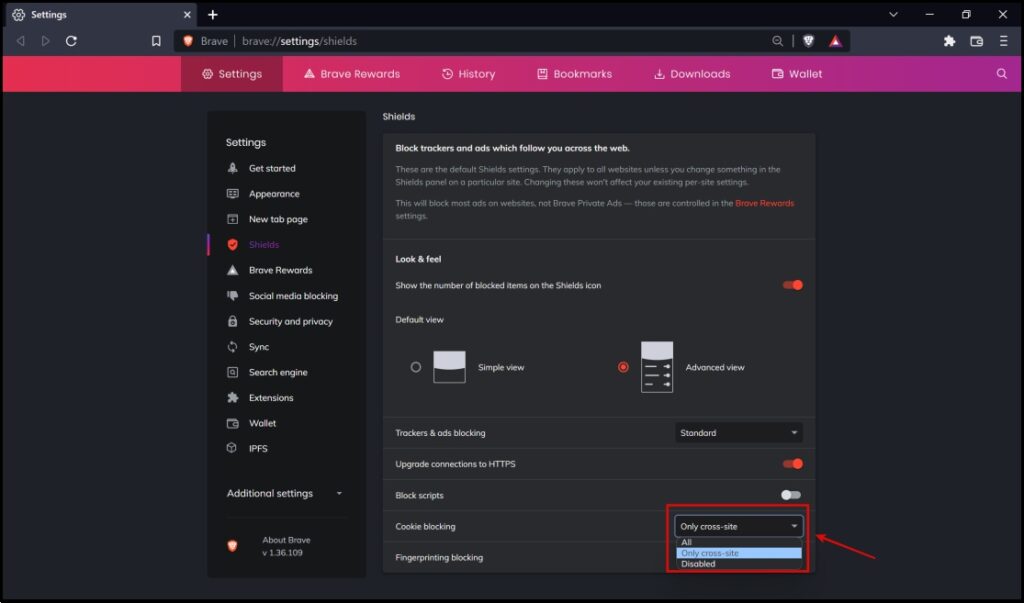
- Only Cross-site Accepts and allows only first party cookies (cookies originating from the sites that you actually are present on) and blocks all other cookies.
- All: Blocks All the cookies from the site that you are visiting – including the first party cookies.
- Disabled: Accepts both first and third party cookies on the site.
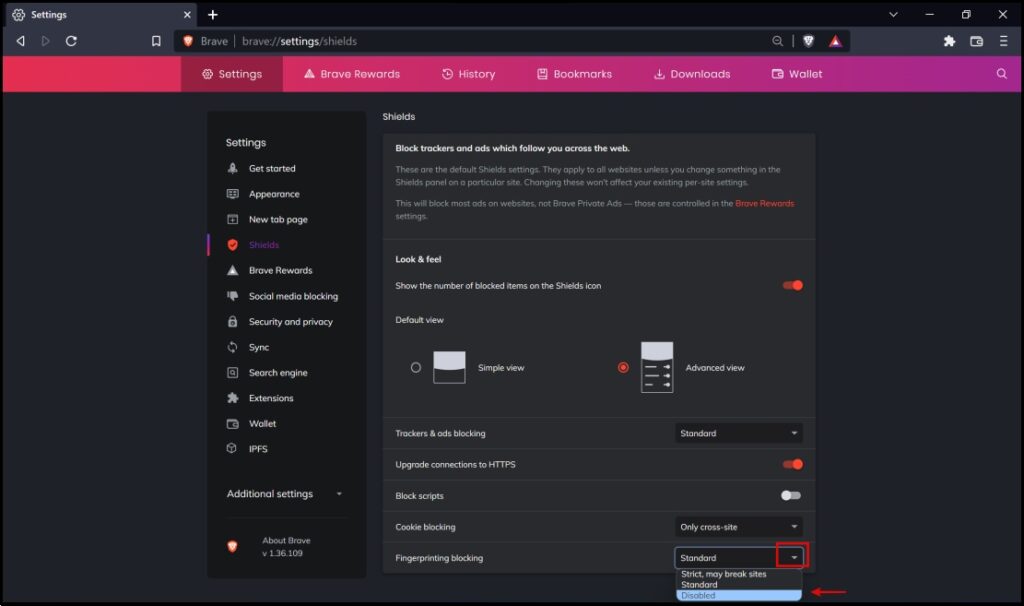
6. Fingerprinting Blocking
Brave Shields provides you with three modes in which you can control fingerprinting – The Strict Mode, Standard (default ) mode, and Disabled.
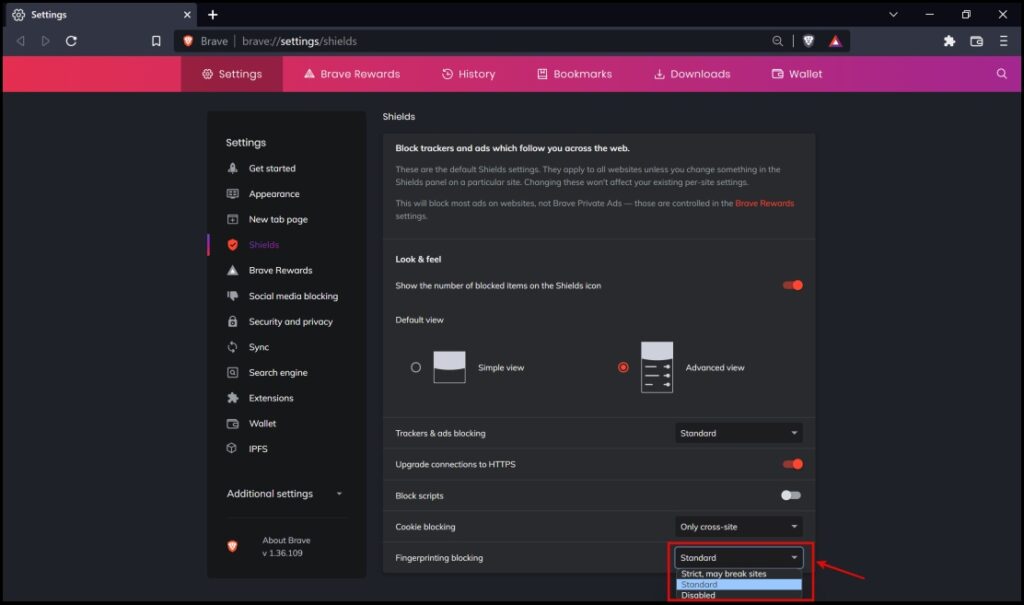
- Standard: Allows first party fingerprinting only – meaning only the site that you are currently visiting can fingerprint you and does not embed fingerprinting from third party sites.
- Strict: This mode blocks all fingerprinting attempts – including first party fingerprinting. Although this option increases privacy, but may also cause additional compatibility issues with websites.
- Allow all Fingerprinting: Allows both first and third party fingerprinting.
This is how you can control the protection features offered by Brave Shields. As mentioned earlier, most users would not require changing Brave Shield default settings, but if you want to experiment and are aware of what these settings do, you can proceed with the same.
How to Turn On or Off Brave Shields
Brave Browser, by default, enables Brave Shield on all websites you visit. However, at times, the protection features of Brave Shield tend to break the way a site is displayed to you. So in case you do not want Brave Shields enabled, here is the process to disable Brave Shields.
Enable or Disable Brave Shields for a Particular Website
Step 1: Visit the website where you want to turn off Brave Shield and click the Shields icon.
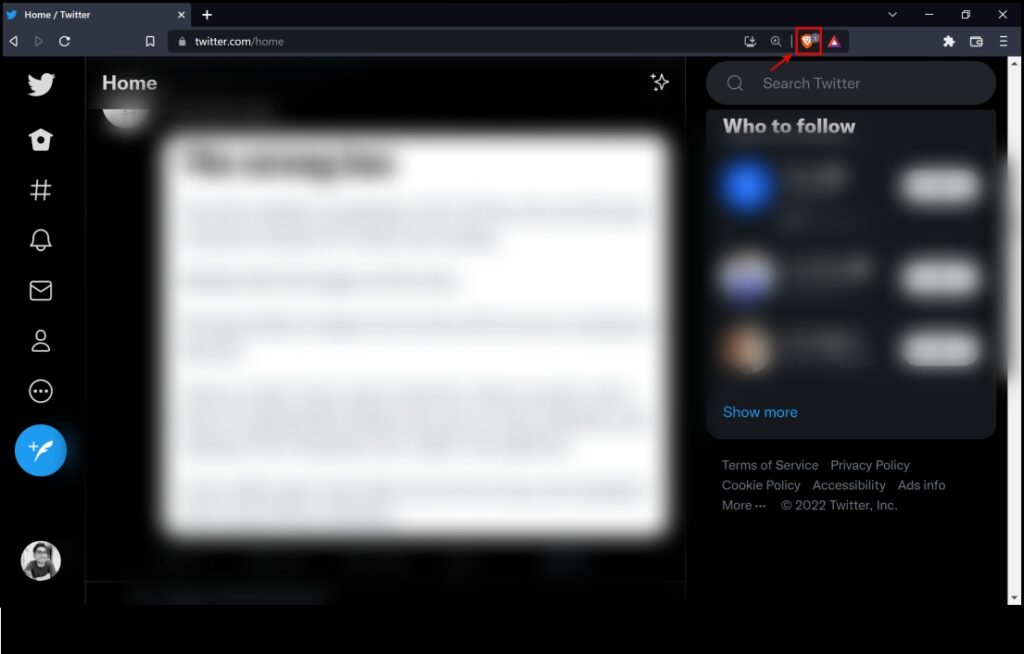
Step 2: Turn off the toggle for “Shields UP for this site.”
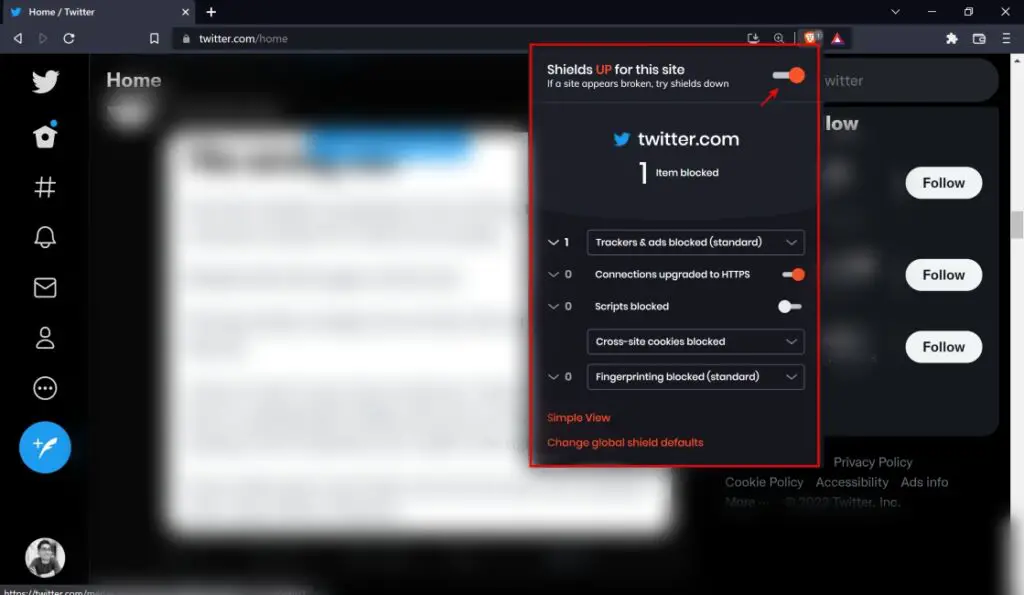
Doing so will turn off the Brave Shields feature for that particular site. Turn on the toggle in case you want to re-enable it.
Enable or Disable Brave Shields for All Websites
While the above two steps help disable the features for just one specific website, we have a workaround to turn off Brave Shields browser-wide. Here’s how to do it:
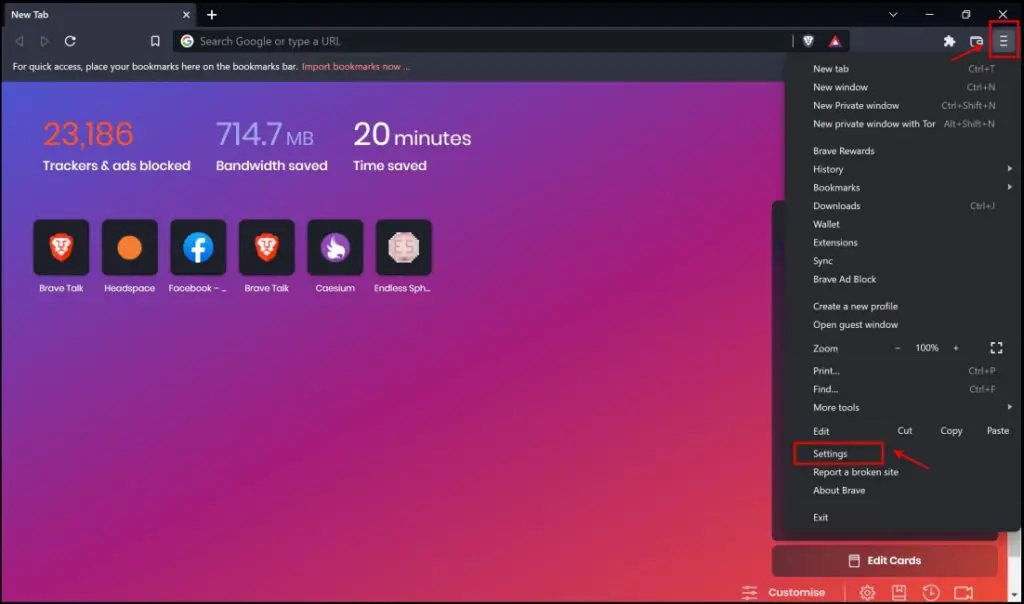
Step 1: Click the hamburger menu on the top right and click Settings.
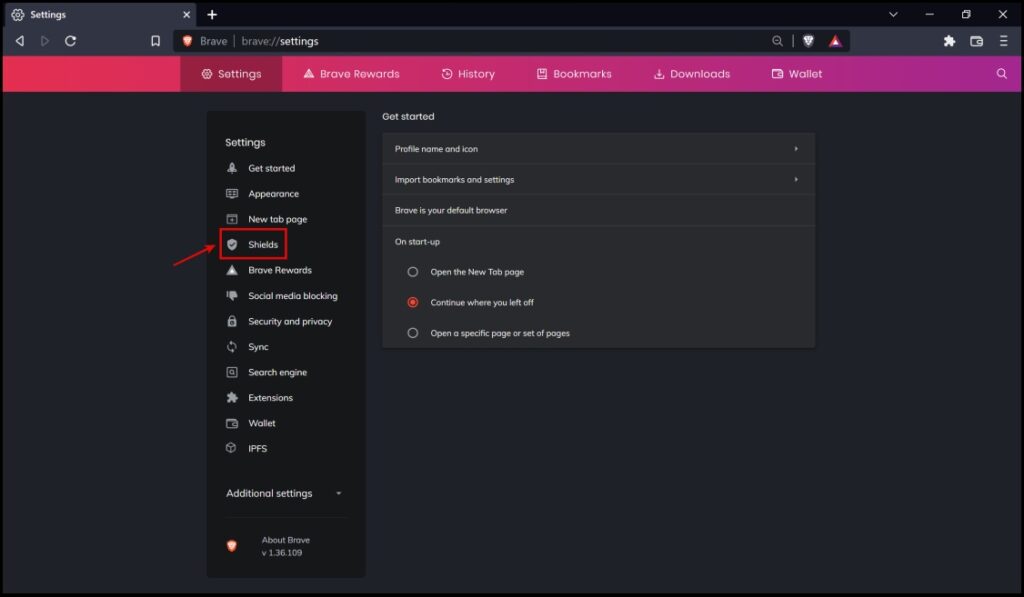
Step 2: Click on Shields.
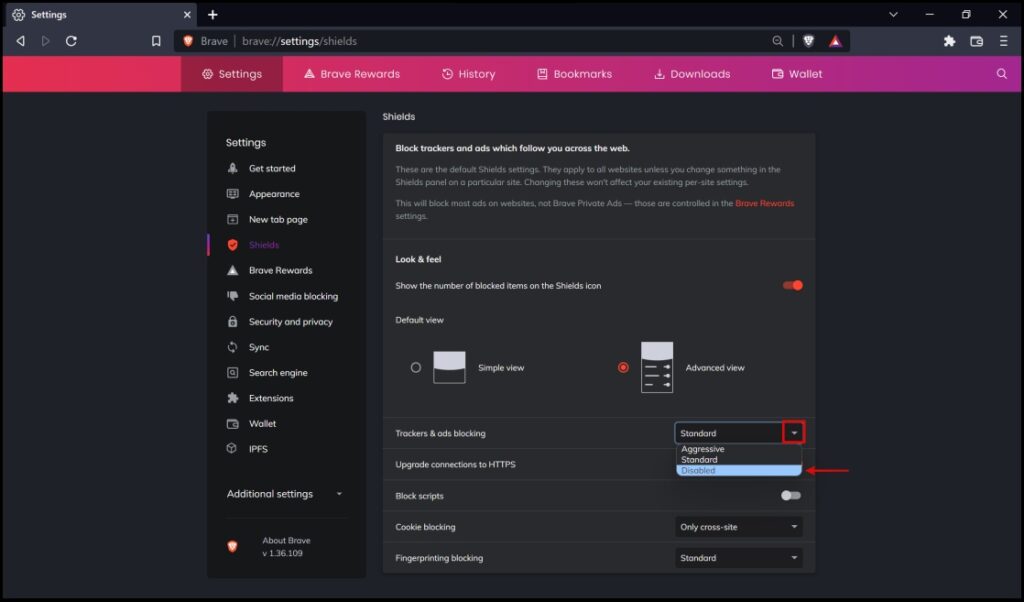
Step 3: You can now disable the effect of each feature in Brave Shield.
Step 4: Click the drop-down menu next to Trackers and ads blocking > select Disabled.
To re-enable it back to the default state, select Standard.
Step 5: Next, turn off the toggle for Upgrade connections to HTTPS.
Step 6: Furthermore, click the drop-down menu next to Cookie Blocking. Choose Disabled.
To re-enable it back to the default state, click on Only Cross-Site.
Step 7: Lastly, click on the drop-down menu next to Fingerprinting Blocking and select Disabled.
To re-enable it back to the default state, click on Only Cross-Site.
By following the above steps, you can either disable or enable the protection features of Brave Shield as per your requirements.
Wrapping Up
The array of privacy features that Brave provides is commendable, especially given that they offer a good amount of transparency to the end-user. Brave Shields provides a good set of protection features and effectively increases your privacy online. We hope this guide serves you well in exploring Brave Shields, how it works, and how to turn it on or off. Stay tuned for more such guides.