It is the need of the hour to ensure a solid level of safety and privacy on your web browsing activity. Websites strive to track you and your data to the best of their abilities, but you can take several measures to protect your activity as the end-user. Fingerprinting is one such way websites can collect data related to your activity. And in this article, let’s see different ways to stop browser fingerprinting in Chrome, Edge, Brave, and Firefox.
Related | 10 Best Privacy-Focused Web Browsers in 2022
What is Fingerprinting in Browser?
Digital Fingerprints are metrics by which your device and your online activity can be uniquely identified and separated from all other devices and browsers that access the internet. When you connect to the internet, your device will hand over a group of specific data as per the demands of the website you are visiting.
Understanding the Digital Fingerprint Data
Some of the types of data that can form a digital fingerprint are as follows :
- Browser Type & Version
- Language Used
- Time Zone
- Fonts Used
- Browser Settings
- Active Extensions, Plugins
- Operating System, etc.
When all the available data points (a few mentioned above) are grouped, they form a unique dataset. And using this information, a Fingerprint is generated.
It can contain as many data points available, and there’s a very small chance that another device has the same set of details, which makes it unique – and hence it is called a Fingerprint.
Your fingerprint contains a lot of useful information, which is a dream come true for advertisers and websites that crave, and are constantly hungry for user information. Then, this information is used to show you personalized advertisements.
Cookie-based tracking is getting more difficult with the advent of restrictions posed by web browsers themselves, so advertisers are opting for fingerprinting, and it’s about time we learn how to prevent the same. Some extensions and built-in features on browsers can help us prevent tracking and generate “random” fingerprints to protect our private information.
How to Check if Your Browser is Protected from Fingerprinting?
One hundred percent protection from fingerprinting is not possible, and it is only rational that we can expect partial protection from fingerprinting – especially from extensions. Here’s how to check the same.
Step 1: Visit the Cover Your Tracks website which checks if your browser is fingerprint-proof.
Step 2: Click on Test My Browser.

Step 2: Once the test is complete, it will show the result. It will also provide a summary of how safe your protection levels are.
The below image is a test result where no protection features are enabled.

While extensions and add-ons claim to stop fingerprinting, we recommend using a privacy-focused browser like Brave for better protection.

At least, as per the test results, the built-in feature on Brave seems to check most of the boxes. We shall explore more in the later stages of this article.
Stop Fingerprinting in Google Chrome & Edge
We have several Google Chrome extensions that claim to stop browser fingerprinting to a certain extent. These extensions will also work on Microsoft Edge and other Chromium browsers.
1. Trace Extension
Trace is an extension available for Google Chrome and Edge to protect you from trackers and effectively stop fingerprinting to a certain extent.
Here’s how to install and configure the Trace Extension in your browser:
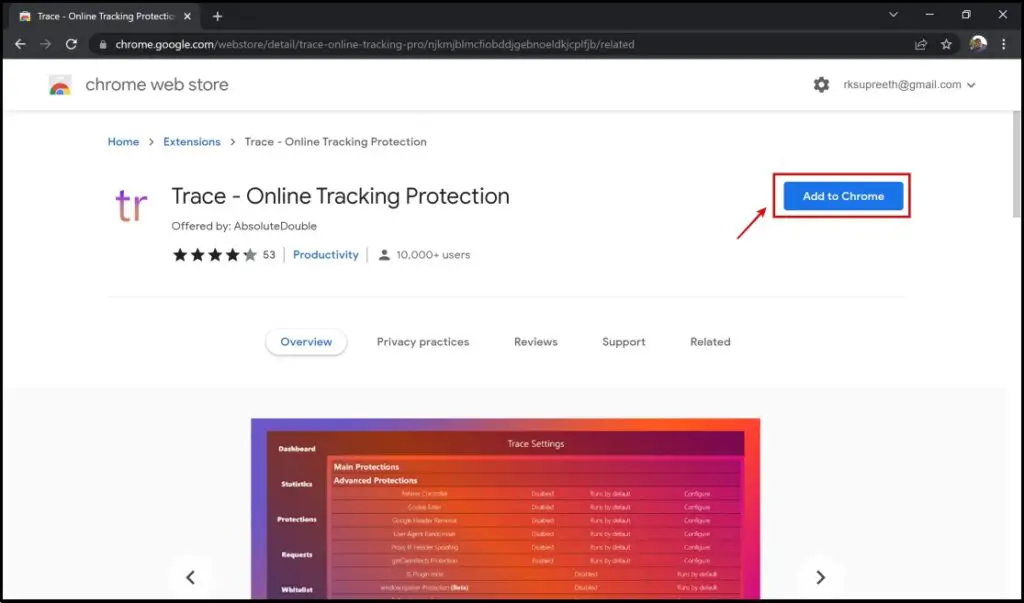
Step 1: Visit the Trace extension page. Click on Add to Chrome > Add Extension.
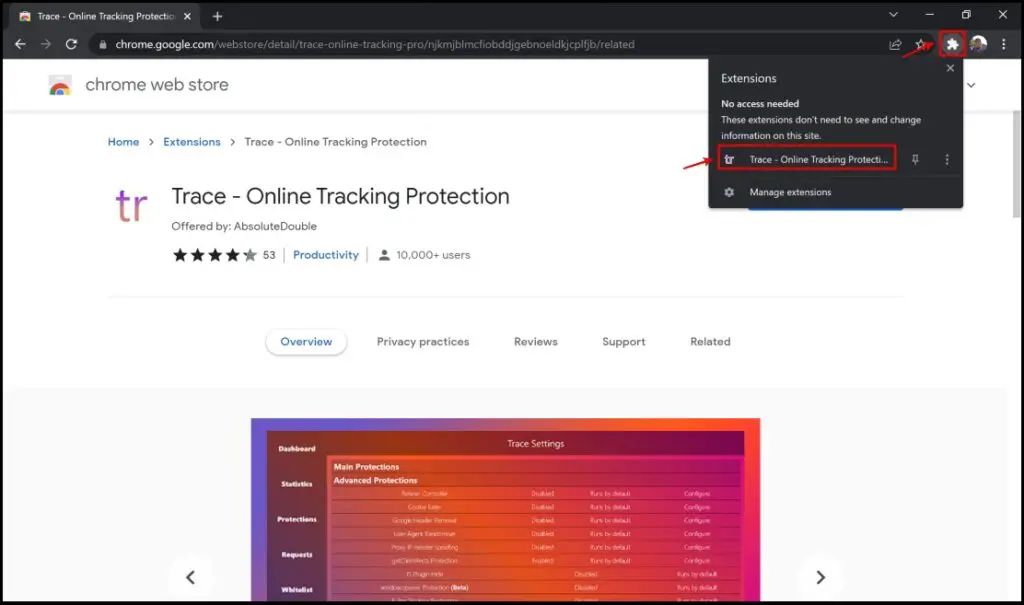
Step 2: Once the installation is complete, click on the extension icon on the toolbar, and then click on Trace.
Step 3: You will now be presented with the main interface of the Trace extension. The protection features will be enabled by default.
Step 4: Click on Settings, to explore the extension and its features.

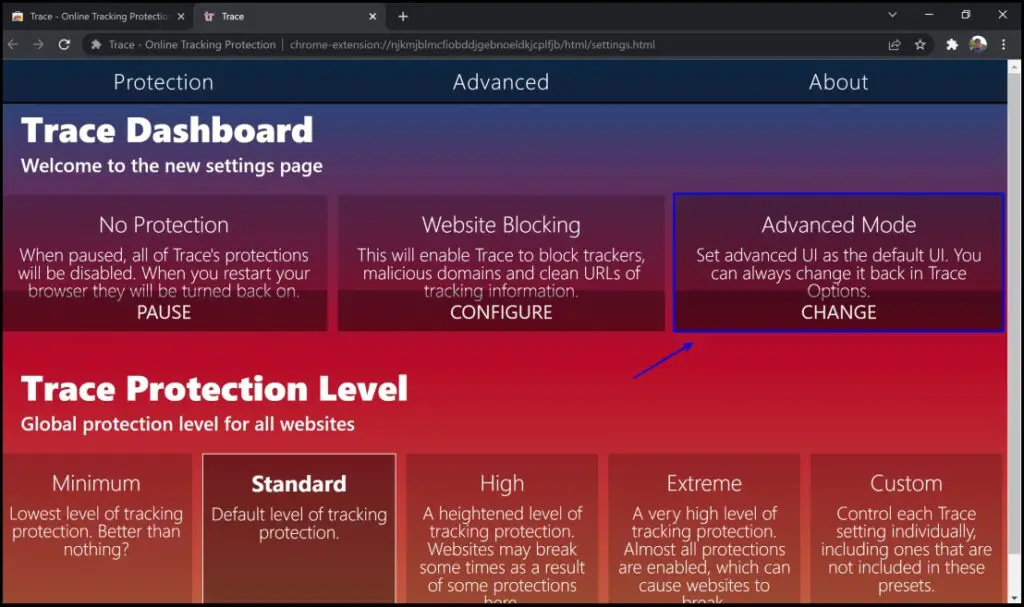
Step 5: Under the Trace Protection Level section, you will be provided with different levels of protection. We recommend keeping it at Standard for most normal users.
Opting for higher levels of protection may end up breaking the websites. In case you want to disable the protection features, you can click on the No Protection.

Step 6: Let us now take a look at the ways by which Trace can protect us from fingerprinting. Click on Advanced Mode.
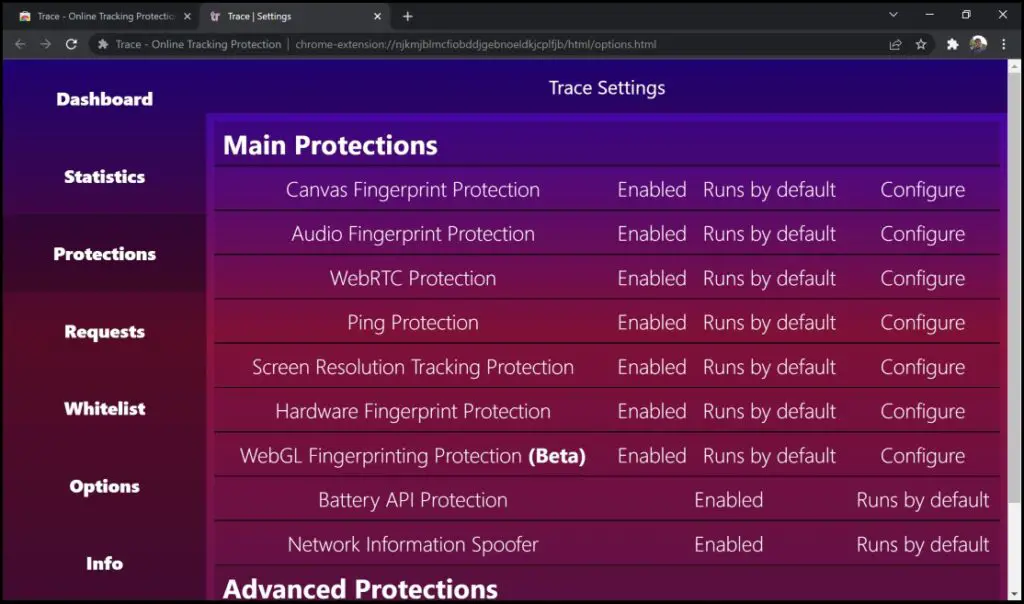
Step 7: Now click on Protections.

Step 8: Here’s an overview of what protection features are enabled. These are the protection features offered by the extension against different forms of Fingerprinting.
Provided you have your reasons to disable any protection, you can just click on “Enabled” to disable them.
When you visit a website, it attempts to collect your Fingerprints through multiple requests. Trace protects you and displays the number of requests that it has blocked from the site.

2. Canvas Fingerprint Defender
Canvas Fingerprint Defender is a super minimal extension that is available on Chrome and Edge. It defends you from fingerprinting by generating fake values for the fingerprint – essentially keeping your personal information secure.
Here’s a how to install and configure the Canvas extension:
Step 1: Vist the Canvas Fingerprint Extension page. Click on Add to Chrome > Add Extension.
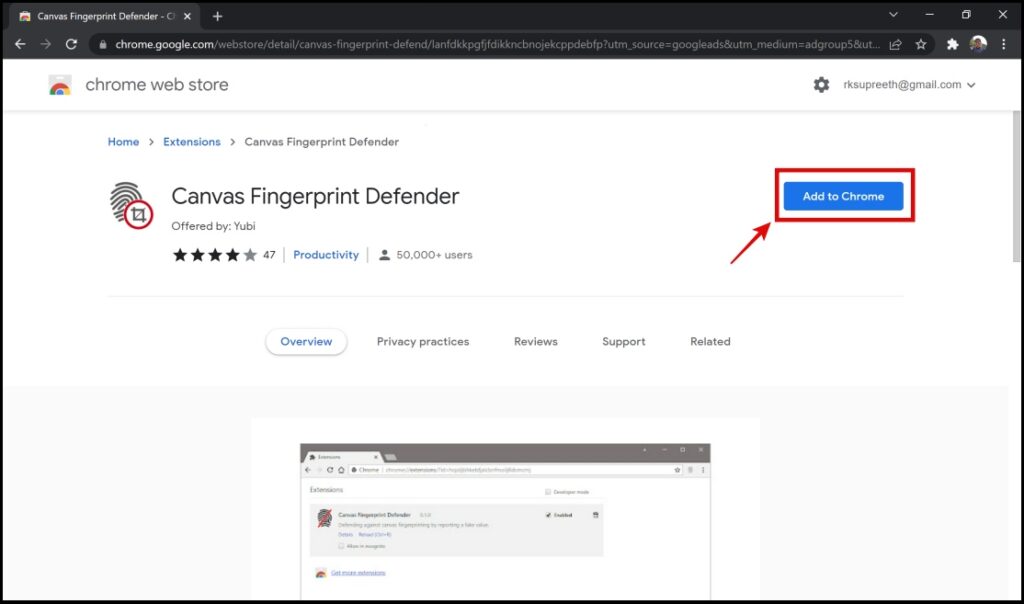
Step 2: Once the installation is complete, click on the extension menu on the toolbar. Then, click on the Canvas Fingerprint Defender extension.
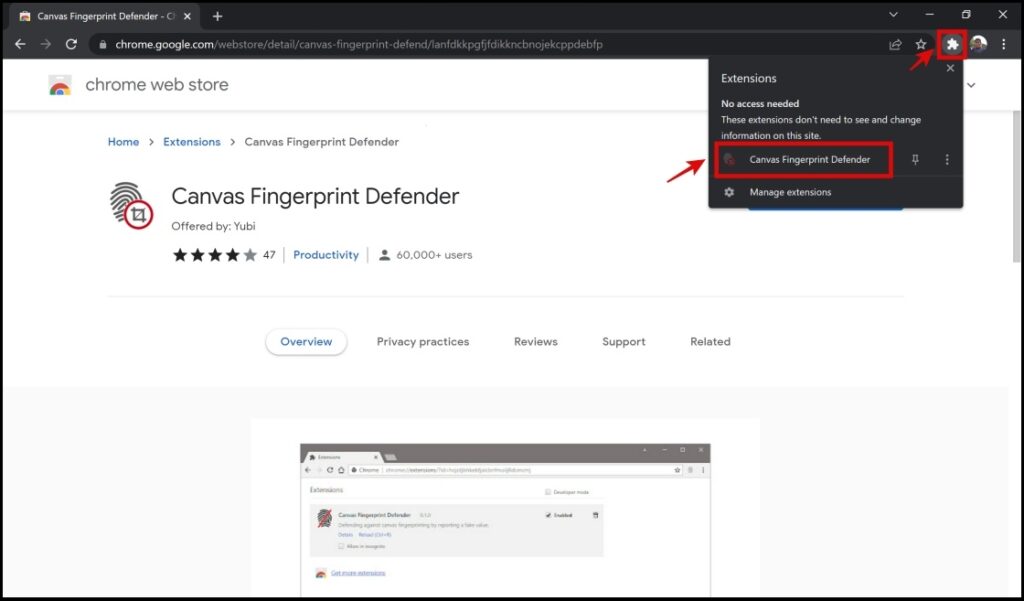
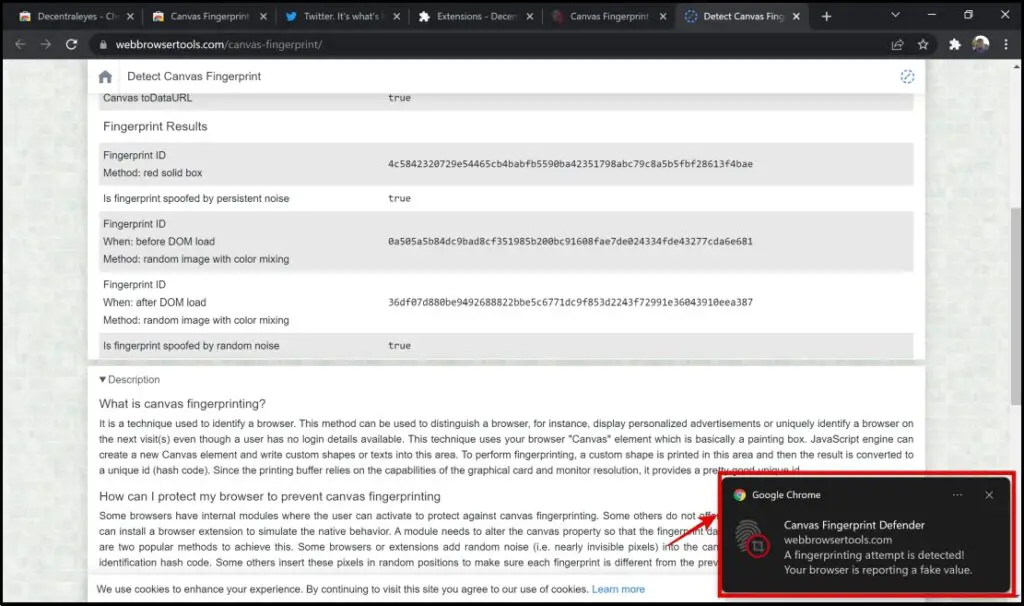
Step 3: The extension will now be active with protection features effective immediately.
For example, the image shown below is how the extension notifies you whenever it defends you against a fingerprinting attempt.
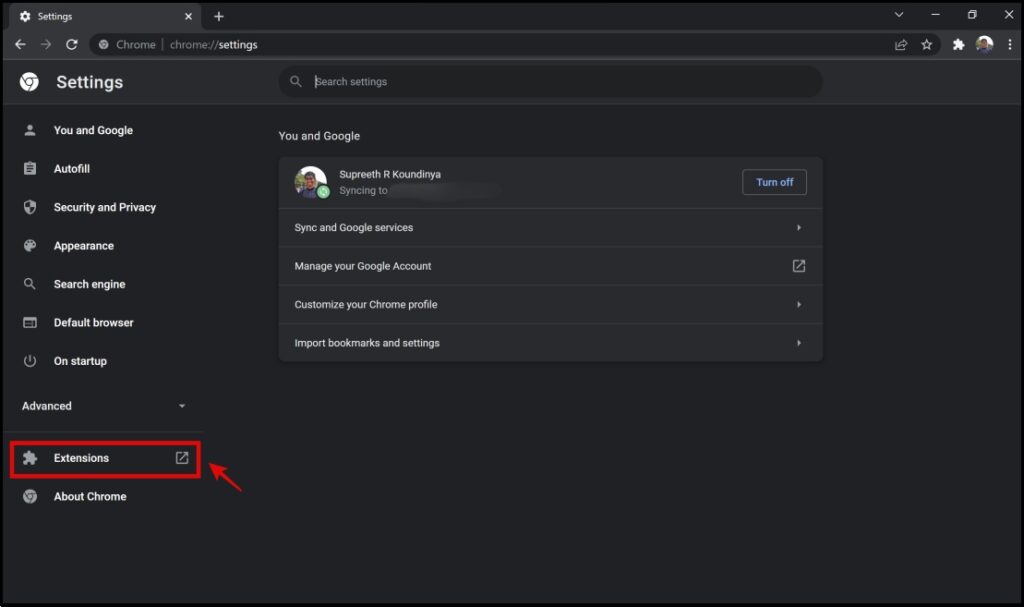
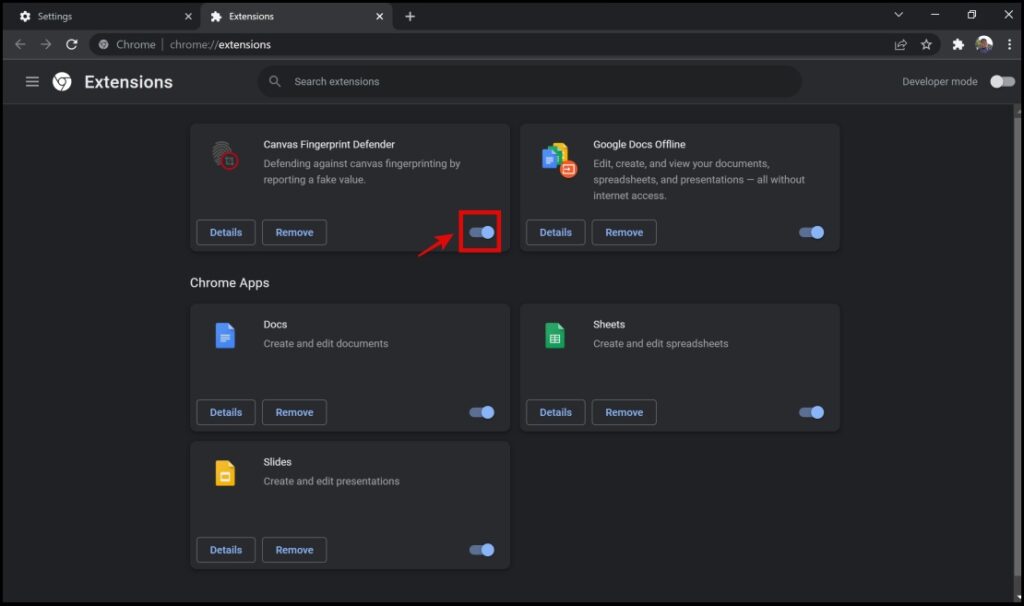
Step 4: In case you want to disable the protection features, you have to turn off the extension from the settings, as shown below.
- Click the three dots menu icon on the top right > click on Settings.
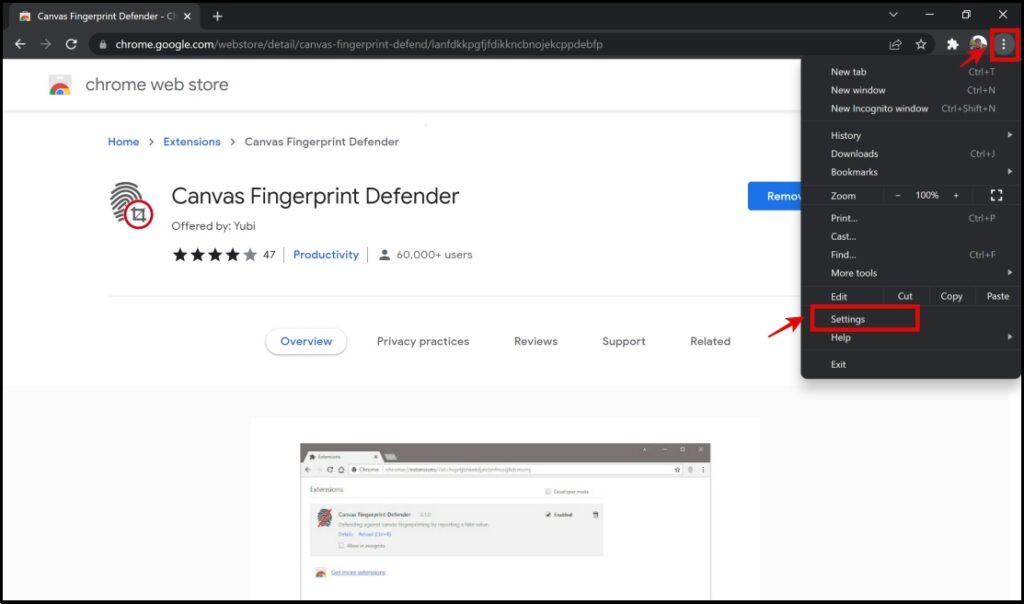
- Click on Extensions.
- Turn off the toggle for the Canvas Fingerprint Defender extension. This will now disable the extension and turn off the protection features. Turn the toggle back on in case you want to re-enable the extension.
3. Privacy Badger
Blocking trackers and ads that track your web browsing activity can stop fingerprinting to a certain extent. Privacy Badger is a popular extension for Google Chrome that helps you block trackers.
Here’s how to install and configure Privacy Badger in Google Chrome:
Step 1: Visit the Privacy Badger extension page. Click on Add to Chrome > Add Extension.

Step 2: All you have to do is complete the first step to activate the extension and its features.
To explore the extension further, click on the extensions menu on the top right corner and click on Privacy Badger.

Step 3: The main interface of the extension displays the number of trackers that have been blocked. It has a simple interface and does what is just about necessary to block trackers.

Step 4: In case you want to disable the protection features on a particular website, click on Disable for this site.

Stop Fingerprinting in Firefox Browser
Firefox comes with an added fingerprinting prevention tool embedded into its privacy features. This is a highly appreciated built-in feature, as it does not require installing any third-party extensions. To use it:
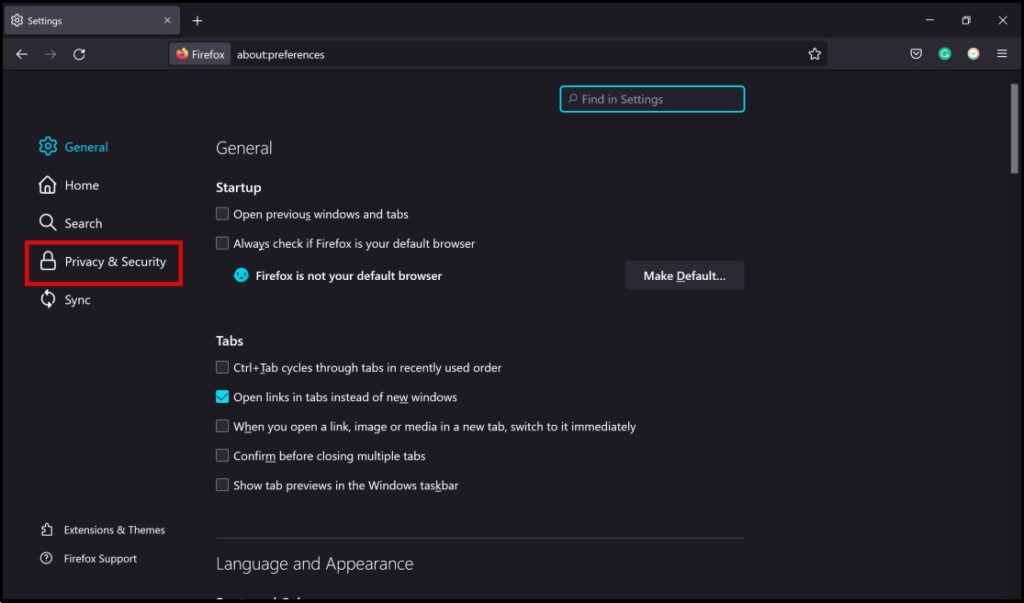
Step 1: Click the hamburger menu on the top right section of the screen.

Step 2: Click on Settings.

Step 3: Next, click on Privacy & Security.
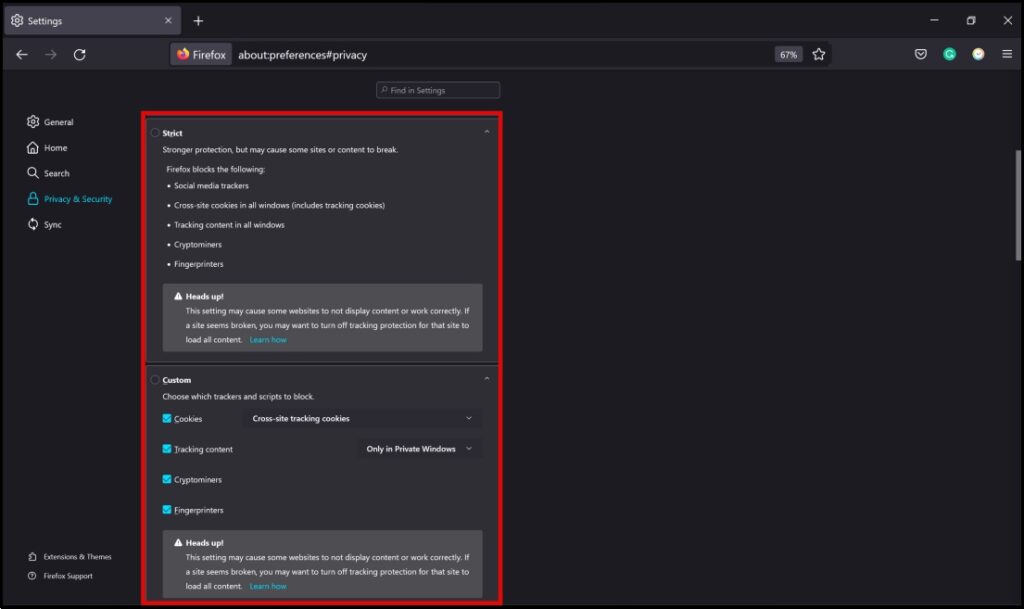
Step 4: These are some of the modes through which Firefox stops fingerprinting attempts. For most users, the Standard mode is just about enough. But, you also have two other modes :
- Strict Mode: Offers a stronger protection level in comparison to the standard mode, but may end up breaking a few websites.

- Custom Mode: Select what protection features you exactly want, provided you know what to deselect/select.
Stop Fingerprinting in Brave Browser
Brave does not leave any stone unturned when it comes to adding an extra layer of security and privacy for the end-user. It is with no surprise that Brave comes with a built-in fingerprinting protection tool.
The fingerprinting protection tool is a part of the Brave Shields feature. Here’s how to use it to stop fingerprinting on Brave Browser:
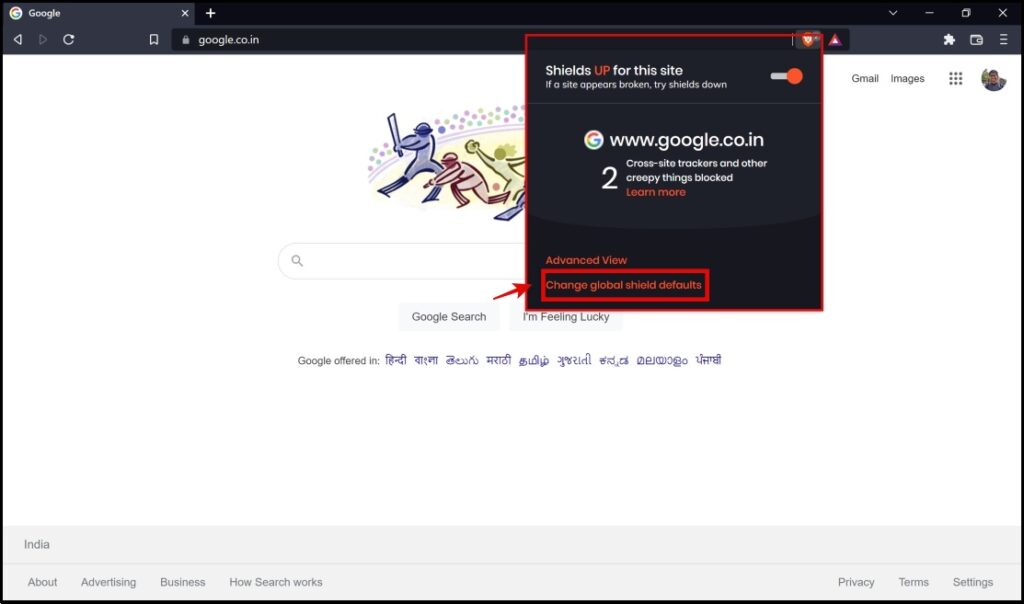
Step 1: To configure the fingerprinting protection feature, click the Brave Shields icon > tap Change global shield defaults.
Step 2: Brave Shields provides you with three modes in which you can control fingerprinting – The Strict Mode, Standard (default ) mode, and Disabled.
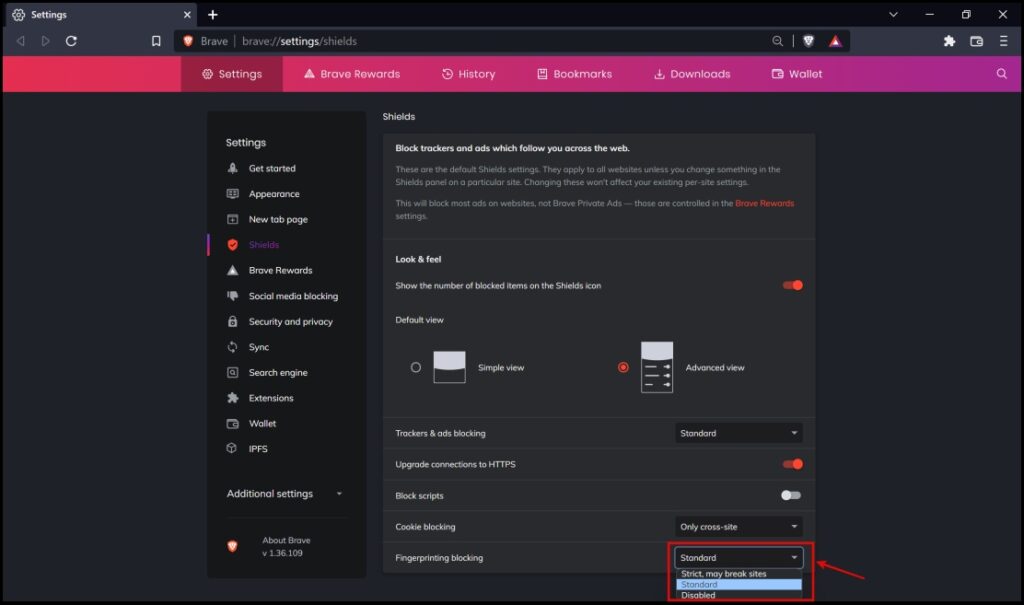
- Standard: Allows first party fingerprinting only. This means only the site that you are currently visiting can fingerprint you and does not allow fingerprinting from third party sites.
- Strict: This mode blocks all fingerprinting attempts, including first party fingerprinting. Although this option increases privacy, but may also cause additional compatibility issues with websites.
- Allow all Fingerprinting: Allows both first and third party fingerprinting.
Step 3: To disable the feature, click on the drop-down menu next to Fingerprinting Blocking and select Disabled.
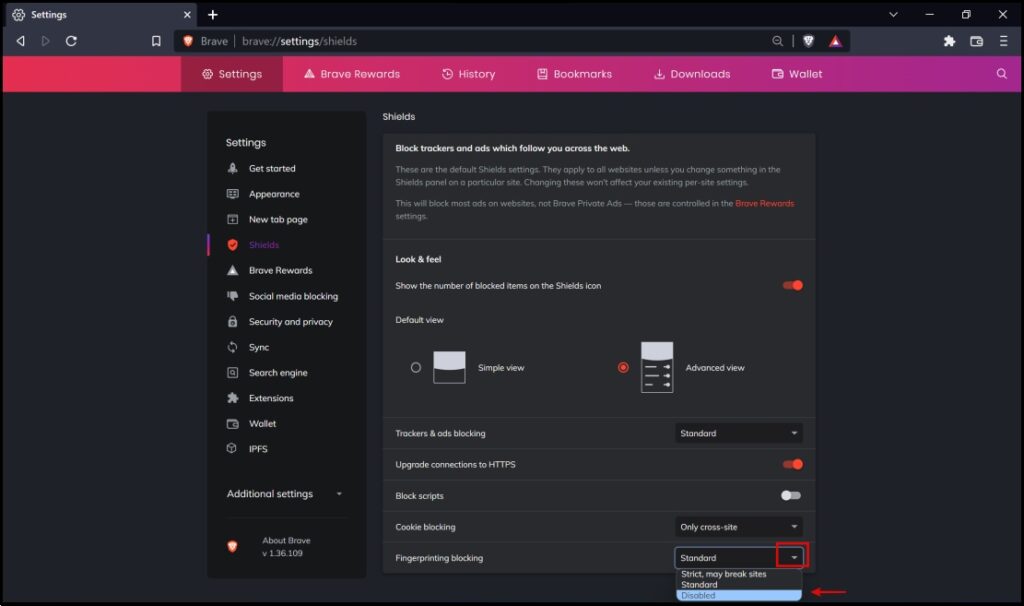
To re-enable it back to the default state, click on Only Cross-Site.
Wrapping Up
Fingerprinting is a notorious way through which advertisers can collect your data, and it’s about time we try our best to protect ourselves. We hope the methods we discussed to stop fingerprinting enable you to do so on different browsers like Chrome, Edge, brave, and Firefox. Stay tuned for more such guides to enhance your privacy levels while browsing the web!


