
Web 3.0 aims to create connected and open websites. And besides leveraging machine learning and AI, decentralization is a major aspect of the new-gen web. Thanks to the concurrent developments in the space, you can now make and publish your own Web 3.0 website on the internet. In this article, let’s see how to create and build your first Web3 crypto website using Unstoppable Domains.
Related | List of 6 Best Web 3.0 Browsers (2022)
Create and Build a Web3 Crypto Website
Web 3.0 refers to the third generation of internet services. It is based on decentralized blockchains. A single party does not hold the data here; instead, it’s on the public blockchain. You can learn more about Web 3.0 here.
One can buy an NFT domain and then build, publish, and host their website on IPFS or InterPlanetary File System Protocol. It is a peer-to-peer network for sharing and storing files.
Here, we’ll be using Unstoppable Domains to create and host a basic decentralized website. The platform offers most things for free- all you need to pay is for the domain.
1. Purchase an NFT Domain
This is the only chargeable thing in the whole process.
To start with, buy an NFT domain on Unstoppable Domains. You need to pay only a one-time fee to purchase the domain name. There is no renewal fee involved.
One can buy domains with .zil, .crypto, .coin, .wallet, .bitcoin, .x, .888, .nft, and .dao extensions. The fee will depend on the domain name, length, extension, and other factors. Longer domain names cost cheaper in general.
Here’s how to purchase the domain:
Step 1: Visit UnstoppableDomains.coms in your browser.
Step 2: Sign up for an account. You can use your Google account for ease of access. You can further connect it to your Metamask wallet.

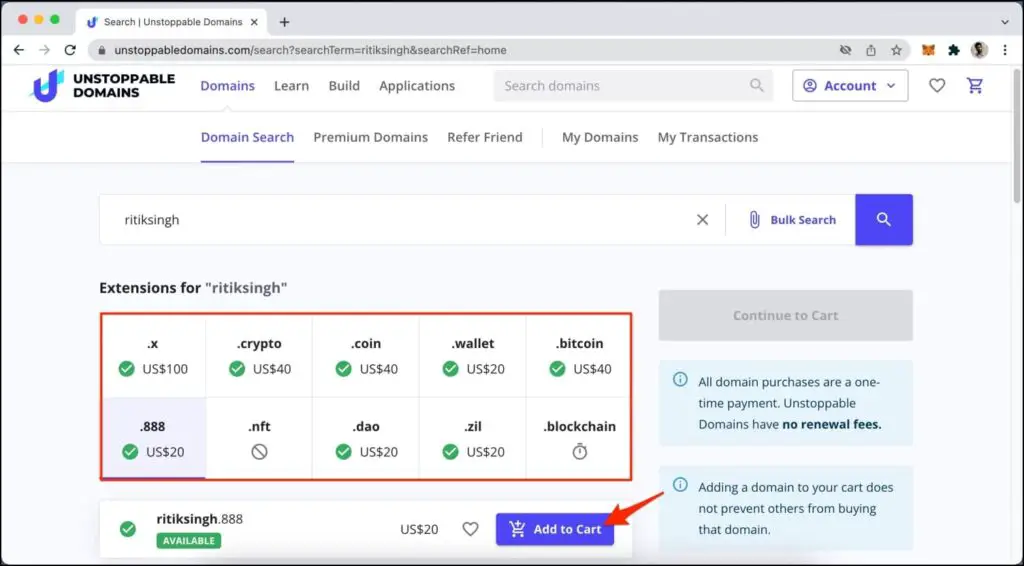
Step 3: Now, go to the Domain Search page and look for the domain you want to buy.

Step 4: It will list all available domain names with extensions and their prices.
Step 5: Select the domain you want and click Add to Cart.
Step 6: Next, tap Continue to Cart.
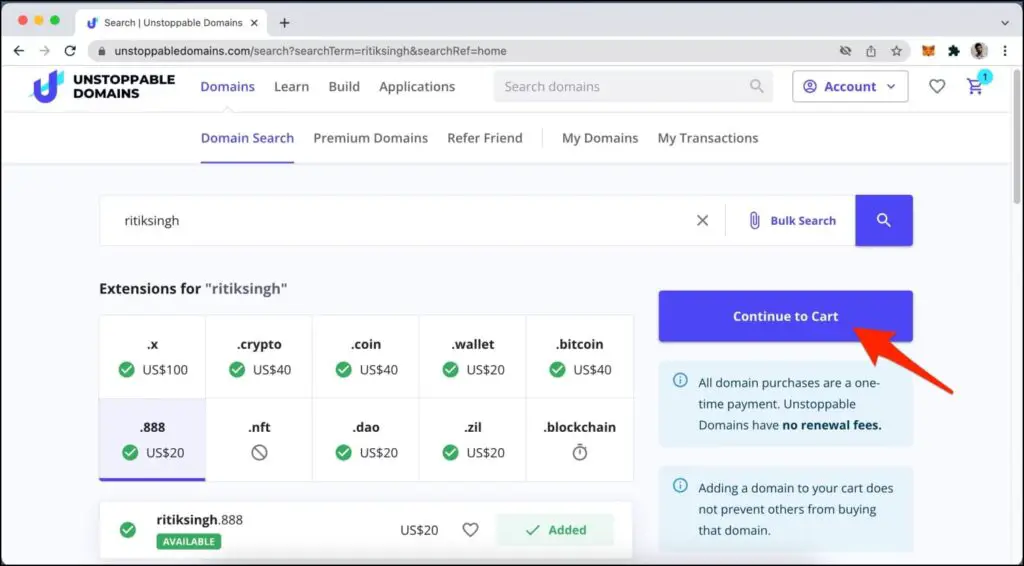
Step 7: Specify whether you live in the US and then proceed to payment.
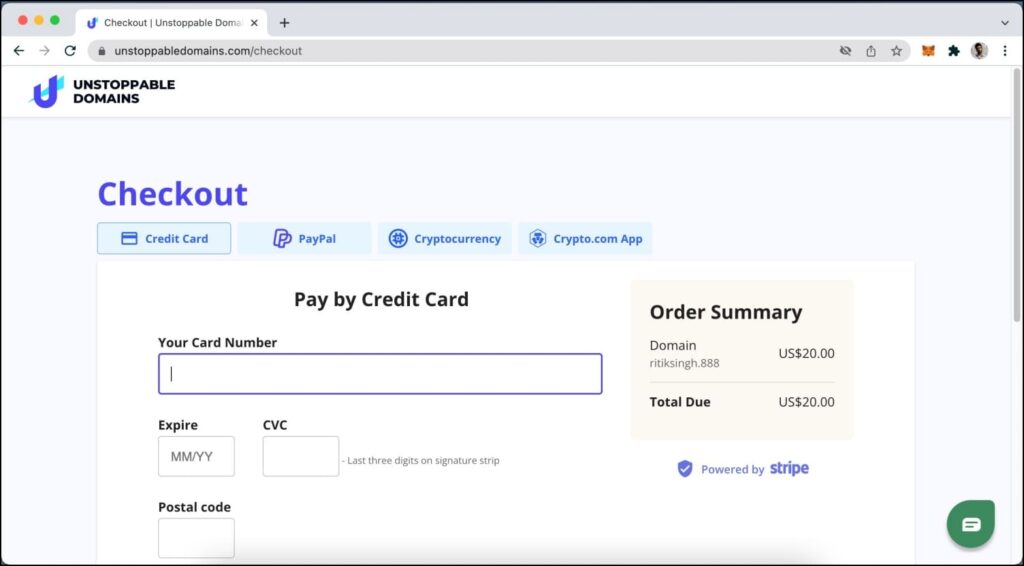
You can pay via credit card, Paypal, cryptocurrency, or Crypto.com app.
2. Mint the Domain for Free
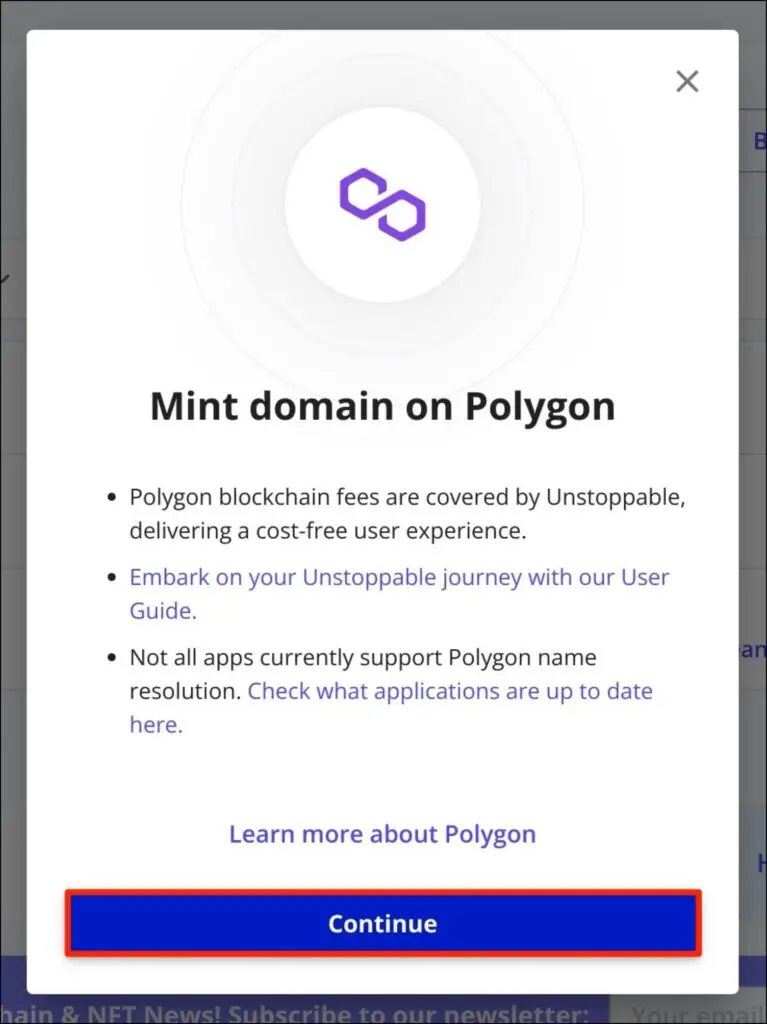
Now that you have bought the domain, it’s time to mint it. Currently, UnstoppableDomains lets you mint the domain on the Polygon network for free without any charge or gas fee.
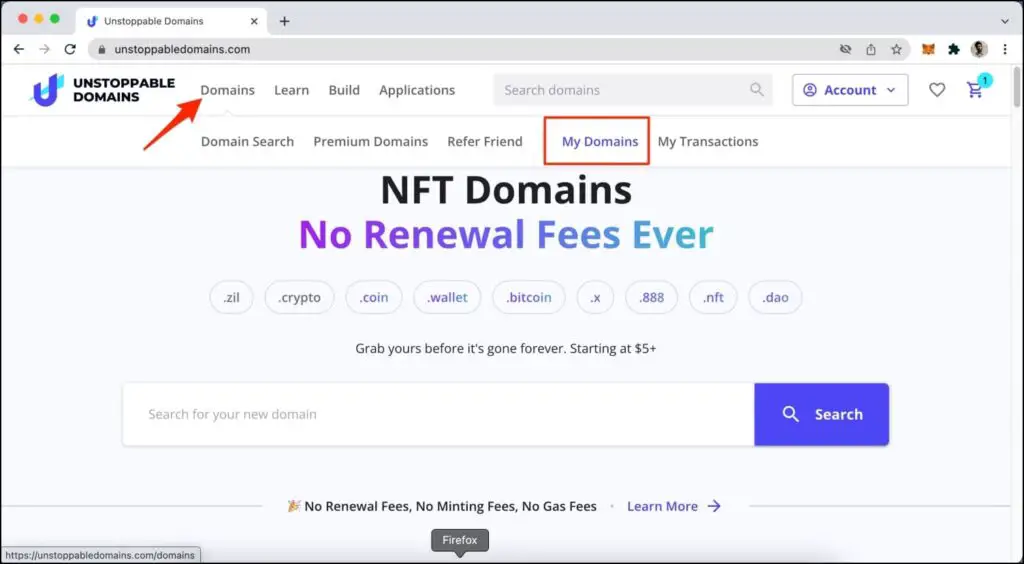
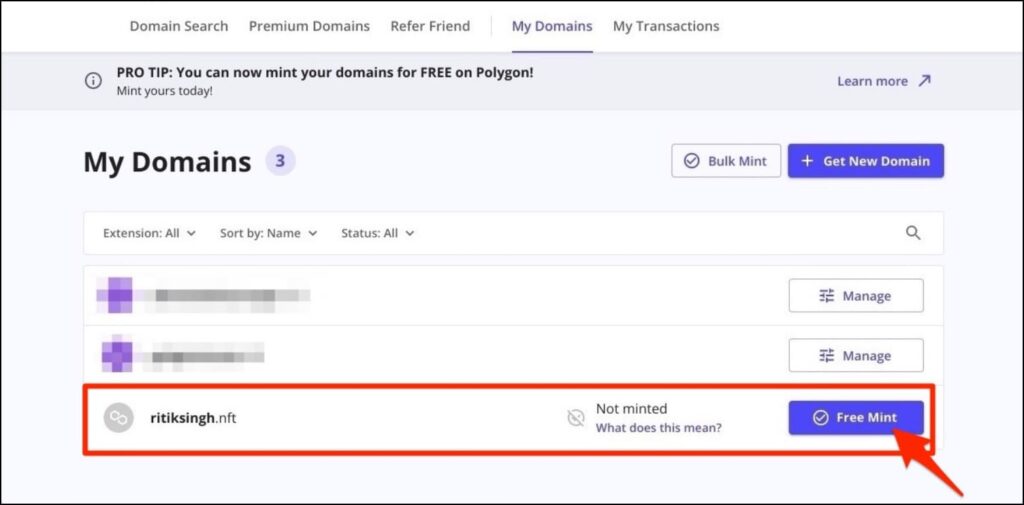
Step 1: On UnstoppableDomains, go to Domains > My Domains from the menu at the top.
Step 2: Here, you will see the NFT domain you just bought. Click on Free Mint next to it.
Step 3: You’ll see a popup explaining the minting process. Click on Continue.
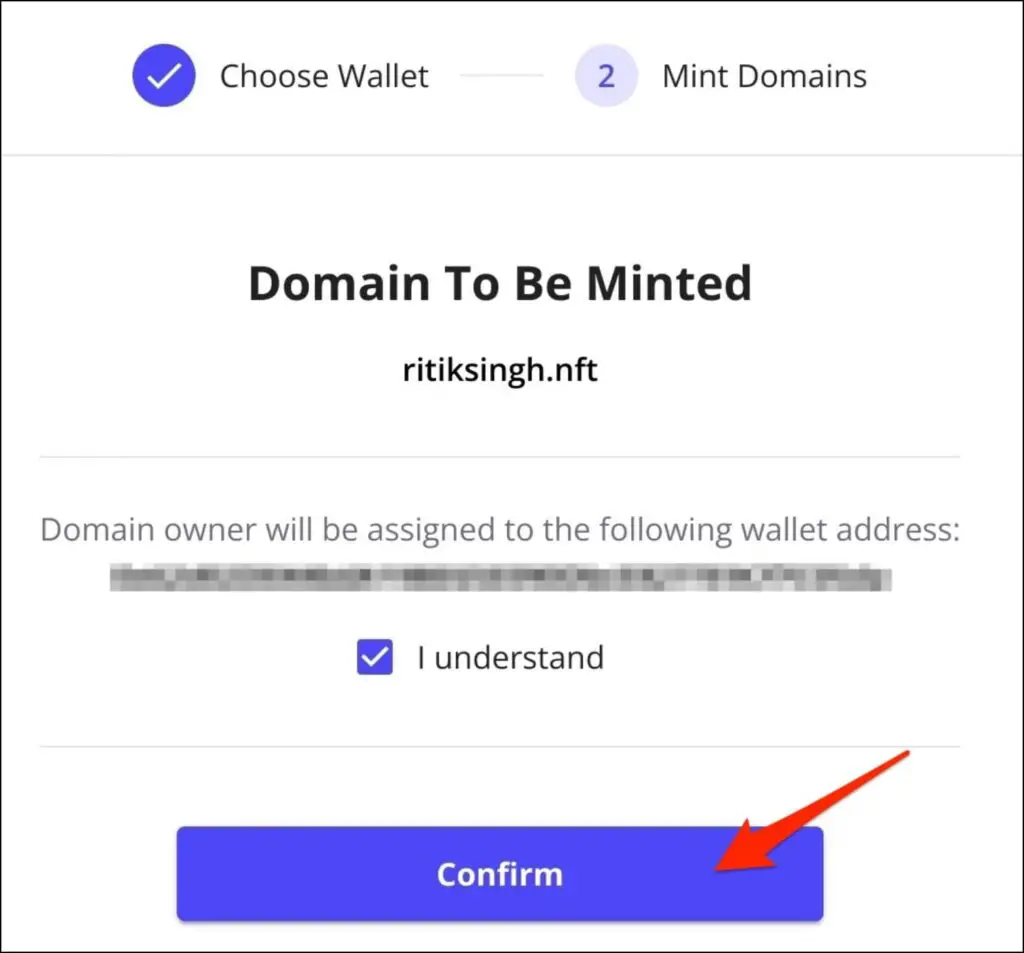
Step 4: Verify email authentication and then proceed with minting.
Step 4: Minting will be done within a few minutes.
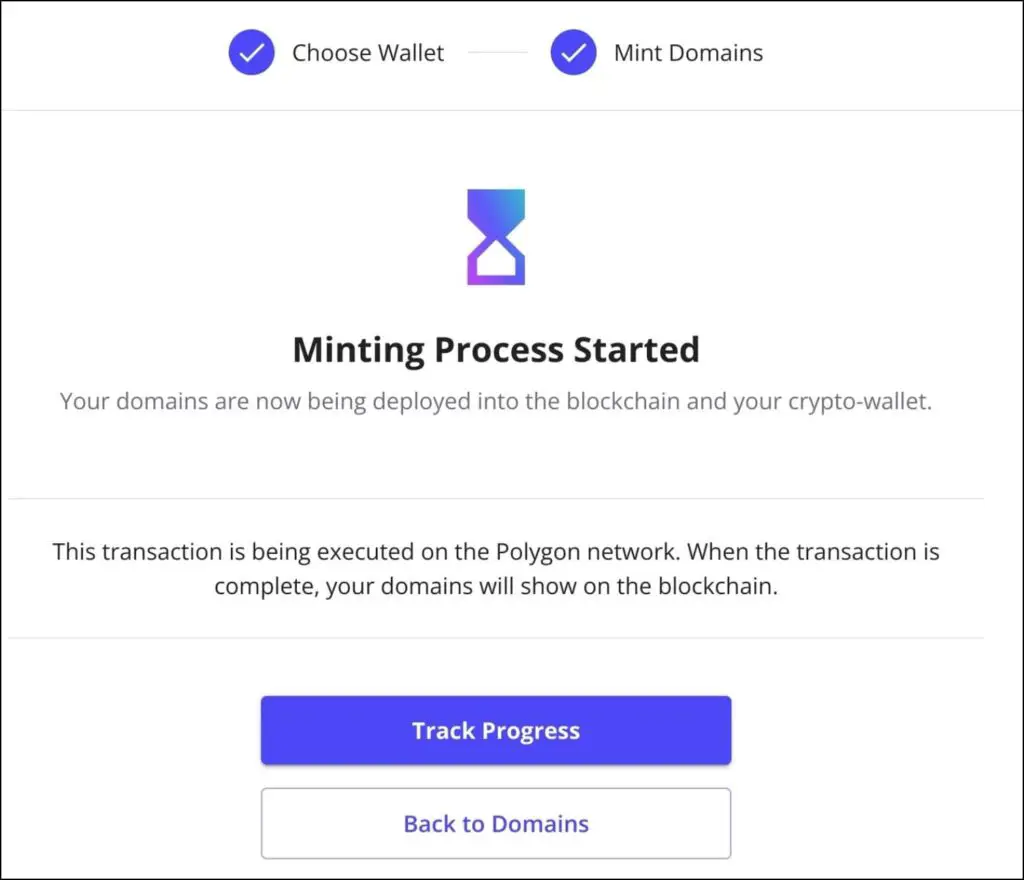
In the meanwhile, you can track its progress using the given option.
3. Build Your Web3 Website
Once minted, you can now build your decentralized Web3 website. Currently, UnstoppableDomains gives you three options- use a preset template to create a website, upload website files to IPFS, or redirect to an existing website.
Method 1- Create Website Using Templates
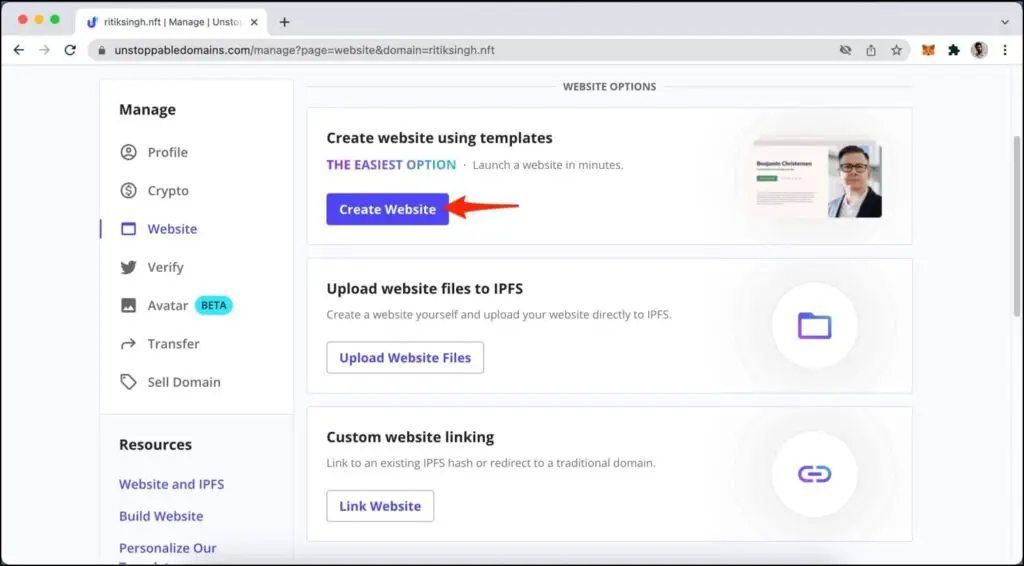
Step 1: Go Domains > My Domain and click Manage.
Step 2: Click on the Website from the sidebar.
Step 3: Next, tap Create Website button below Create Website Using Templates.
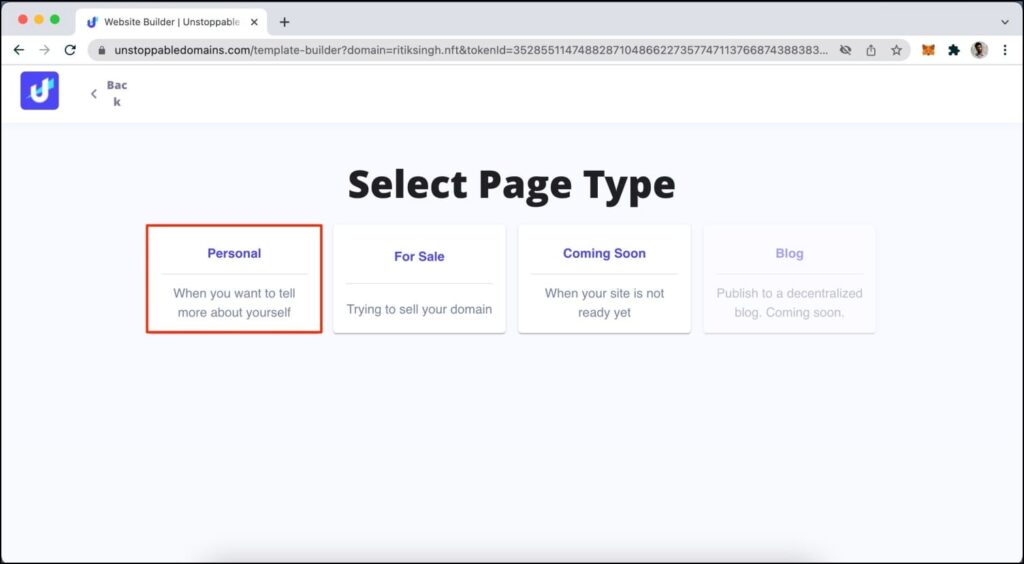
Step 4: Select the page type- Personal, For Sale, or Coming Soon (use this if your site is not ready yet).
Step 5: Then, select one of the preset templates based on the website’s purpose.
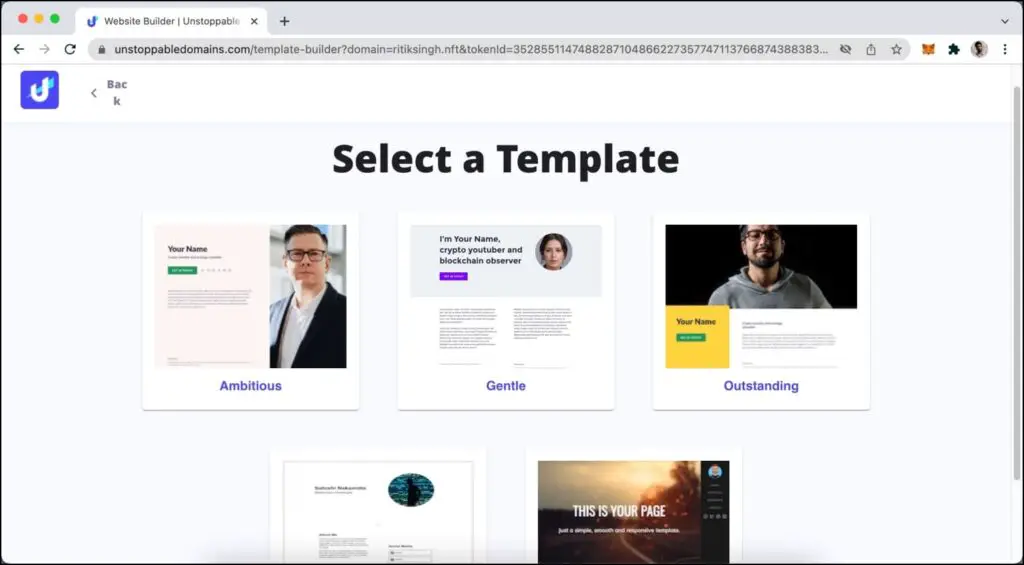
Step 5: Customize the image, columns, text, links, and buttons based on your liking.

Step 6: Then, click Publish to IPFS.

Step 7: Finally, authorize the transaction to prove that you own the domain.
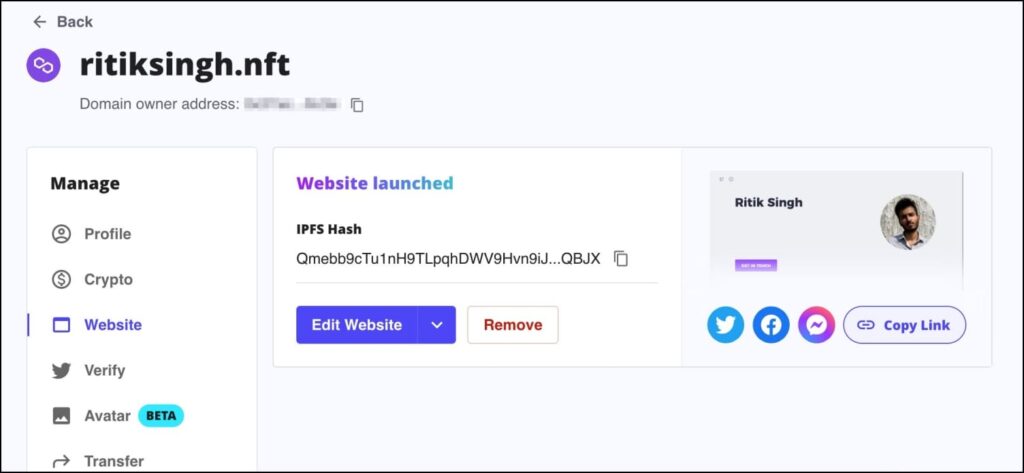
Once done, your website will be uploaded and published to IPFS in about 10-15 minutes. You can track its progress using the given option.
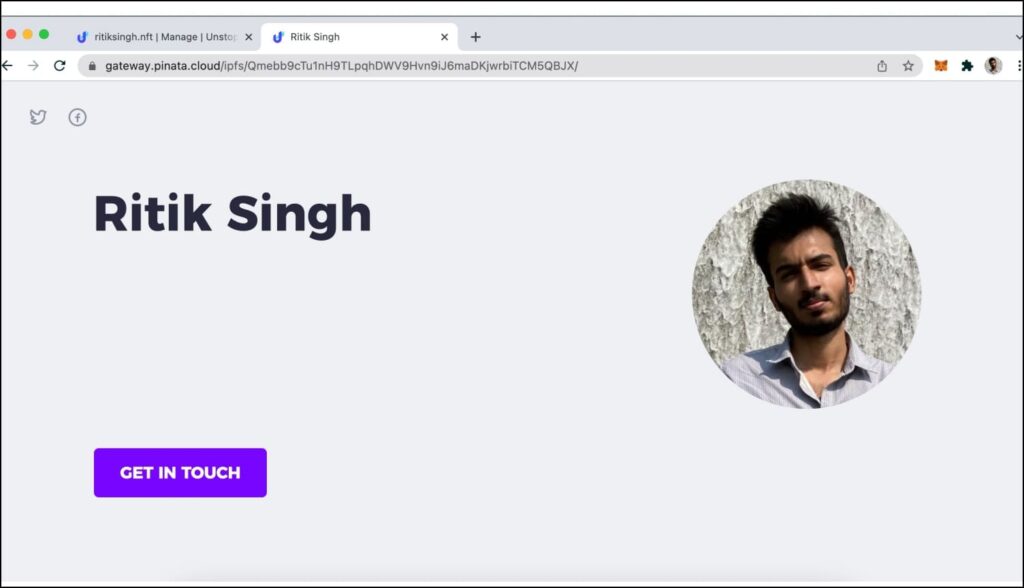
You will get a URL that you can copy and share with others to visit your new website. Besides, it will also give you the IPFS hash for your website stored on the network.
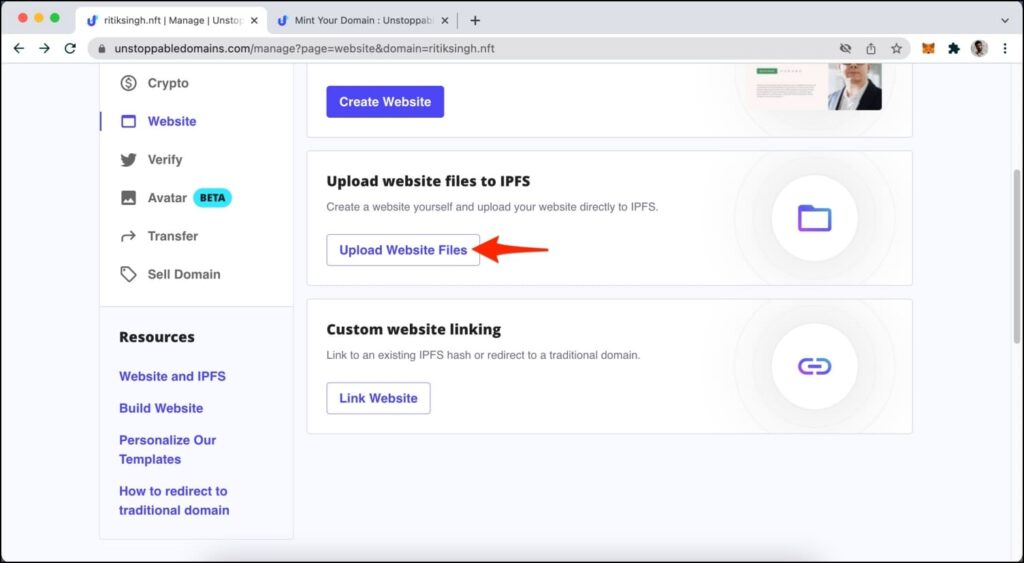
Method 2- Upload Website files to IPFS
If you already have a website that you’d like to use on the NFT domain, you can upload it to the IPFS as shown below:
Step 1: Go Domains > My Domain and click Manage.
Step 2: Click on the Website from the sidebar.
Step 3: Next, tap the Upload Website Files button under Upload website files to IPFS.
Step 4: On the next screen, click Upload and select the HTML or CSS file to upload. The files limit is 20MB.
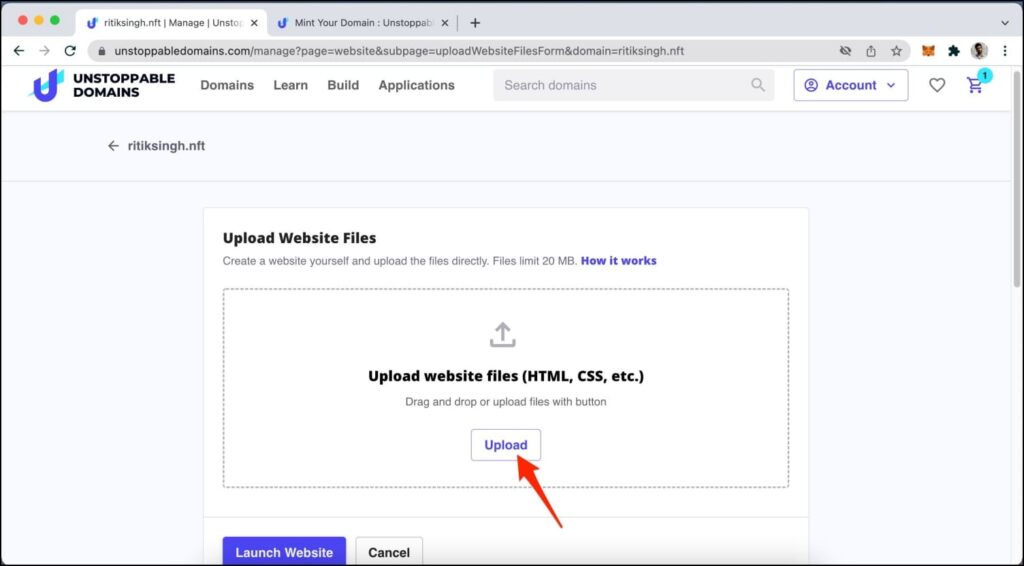
Once uploaded, click Launch Website, and your website will be published on the Unstoppable Domain.
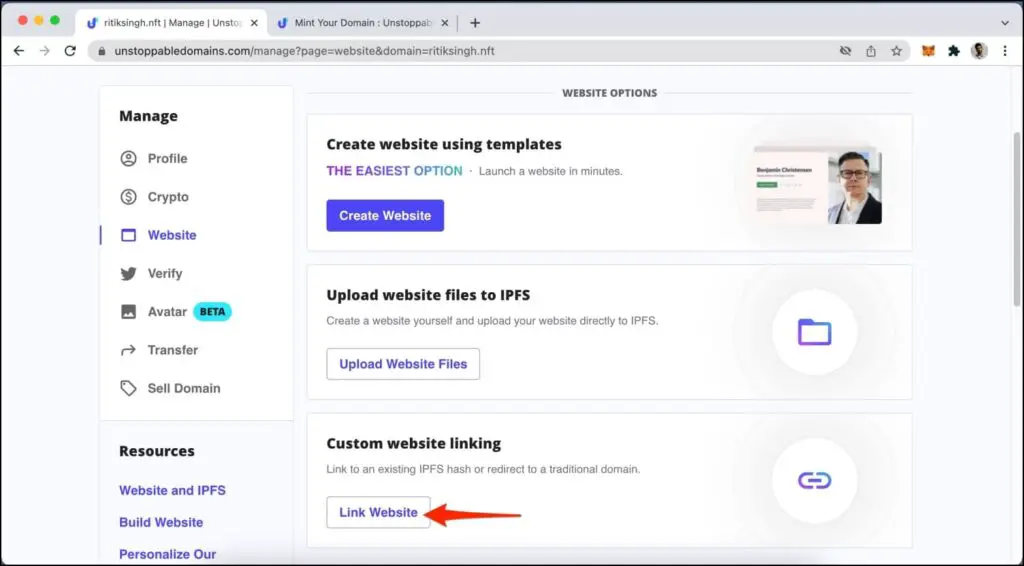
Method 3- Link or Redirect to an Existing Website
Lastly, you can link or redirect your NFT domain to an existing IPFS hash or a traditional website. If you have already uploaded your website to an IPFS gateway like Pinata, follow the steps below:
Step 1: Go Domains > My Domain and click Manage.
Step 2: Click on the Website from the sidebar.
Step 3: Next, tap the Link Website button under Custom website linking.
Step 4: Enter the existing IPFS hash.
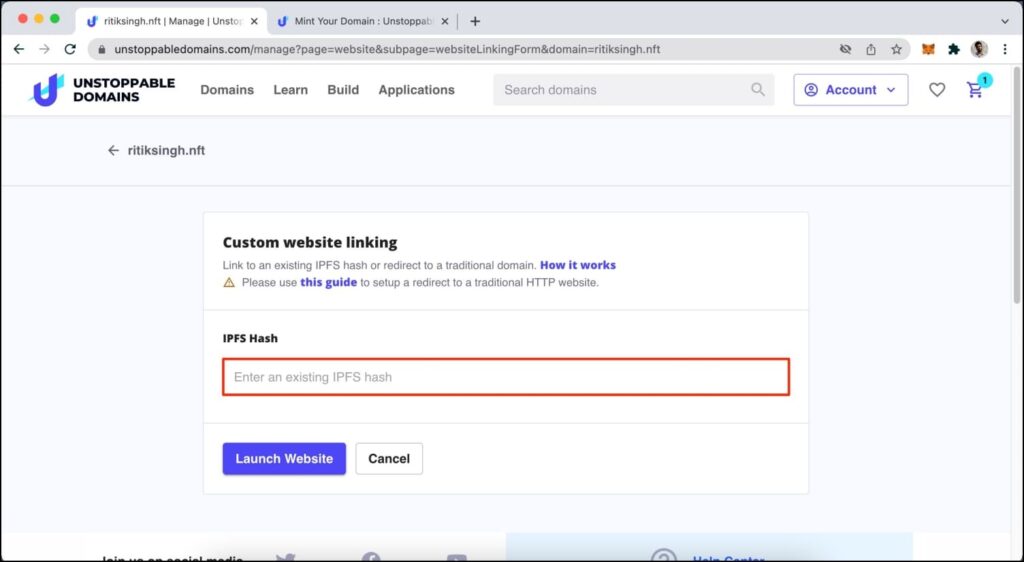
Step 5: Click on Launch Website and sign in with your wallet to confirm the transaction.
Redirect Your NFT Domain to a Traditional Website:
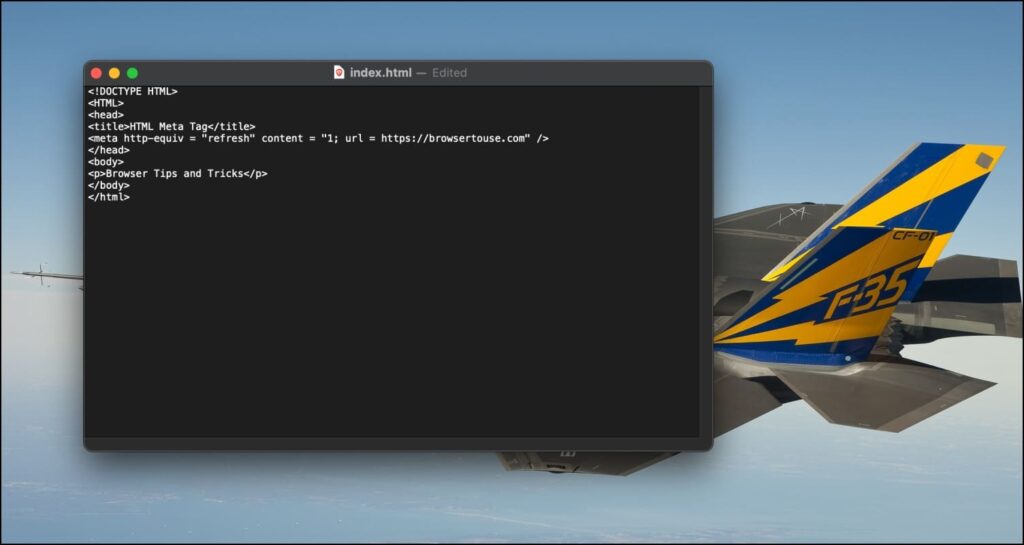
Step 1: Open Notepad or any text editing program on your PC.
Step 2: Here, copy and paste the following code:
| <!DOCTYPE HTML> <HTML> <head> <title>HTML Meta Tag</title> <meta http-equiv = “refresh” content = “1; url = YOUR WEBSITE URL HERE” /> </head> <body> <p>YOUR WEBSITE DESCRIPTION HERE </p> </body> </html> |
Step 2: In the above code, replace YOUR WEBSITE URL HERE with the existing site link (with HTTP:// or HTTPS:// whichever applicable).
Step 3: Then, replace YOUR WEBSITE DESCRIPTION HERE with brief information or description of your site.
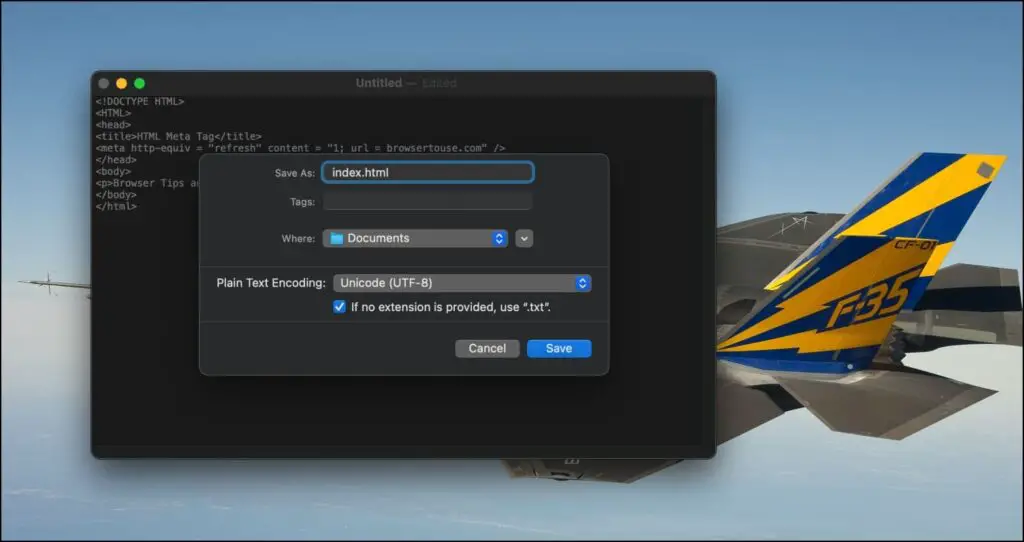
If using TextEdit in macOS, go to Preferences and select Plain text instead of Rich text.
Step 4: Save this file as index.html.
Step 5: Now, right-click this file and open it with any browser to see if it’s working fine.
Step 6: Now repeat Method 2 above and upload this index.html file under Upload Website files to IPFS option.
Step 7: Lastly, click Launch Website.
You can use this method to redirect the domain to a regular website till you create a decentralized Web3 version.
Related | How to Download & Install Opera Crypto Web3 Browser
4. How to View Your Web 3.0 Website
You won’t be able to open your Unstoppable website directly on a traditional browser. To view your .crypto or .nft domains on the blockchain, you either need to use an extension or configure your browser by changing to a custom DNS provider.
Method 1- Change DNS Provider
Below is how you can configure Google Chrome to access the Unstoppable website:
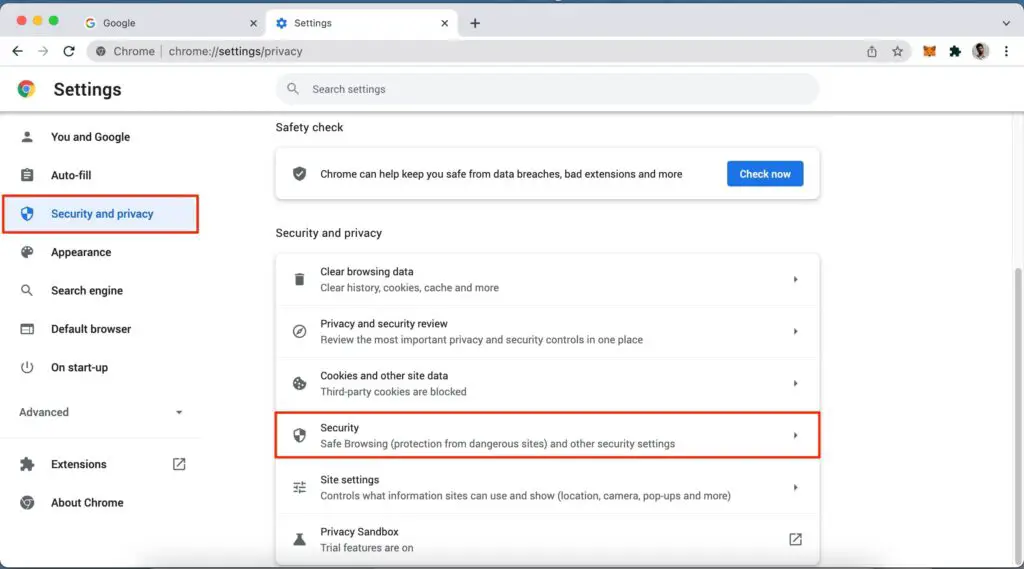
Step 1: Open Chrome and click the three-dot menu > Settings.
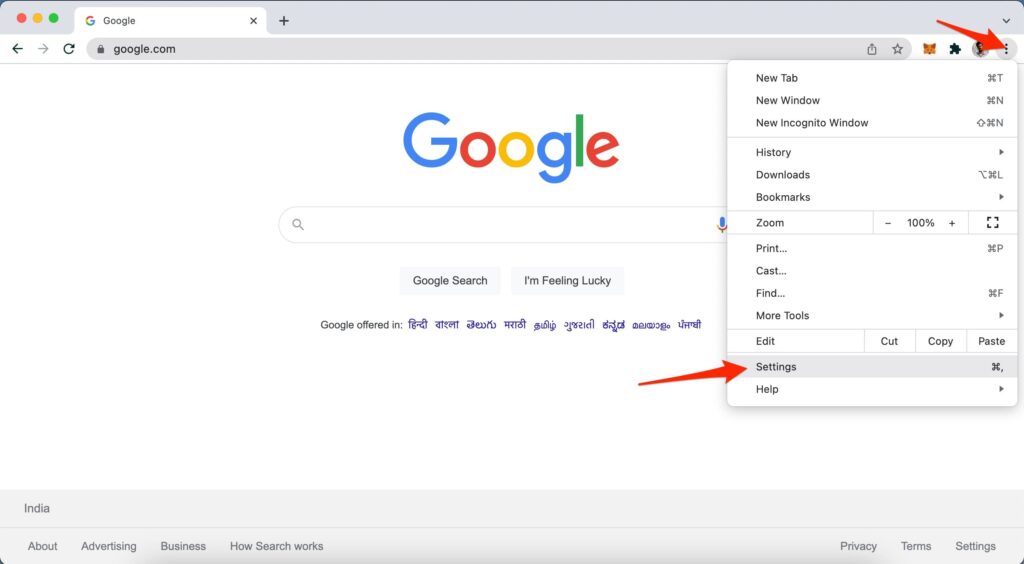
Step 2: Select Security & Privacy > Security.
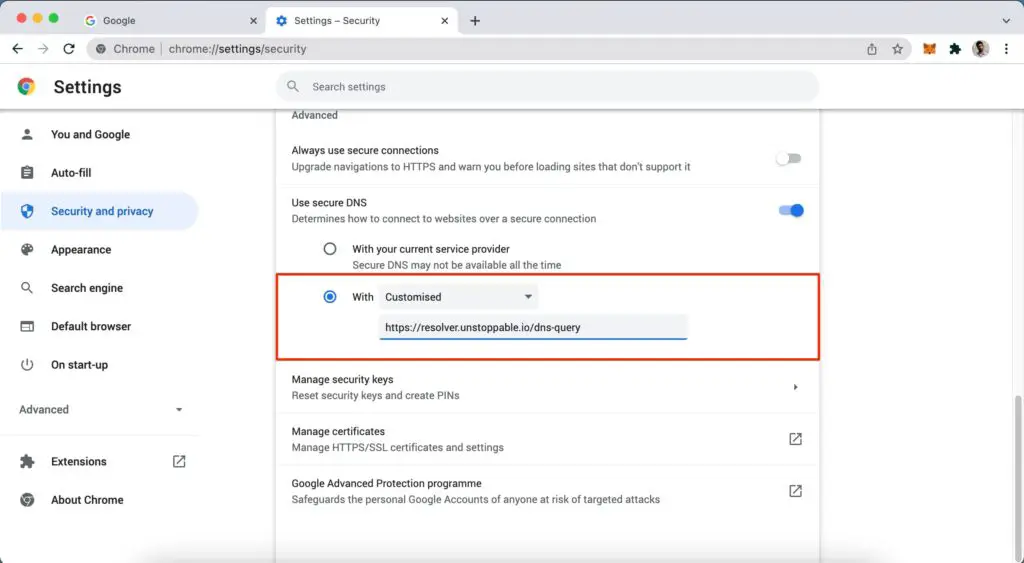
Step 3: Scroll down and click With under Use Secure DNS.
Step 4: Select Customized and enter https://resolver.unstoppable.io/dns-query.
Check this guide from Unstoppable Domains for other browsers like Edge, Firefox, Brave, or Opera.
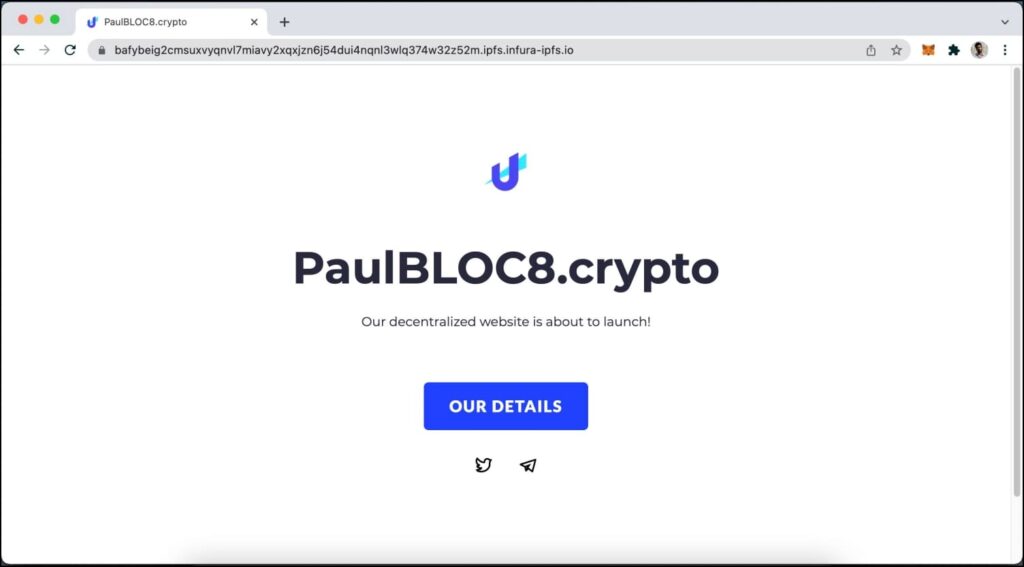
Once you have configured the browser, you can now access the crypto website in two ways:
- Type and enter the Unstoppable domain URL with HTTP (not HTTPS) in address bar: For example, http://domainname.crypto.
- OR enter domainname.crypto/ (with an forward hash to override browser’s search engine)
Method 2- Unstoppable Extension
Alternatively, you can install the Unstoppable extension to your Google Chrome or other Chromium-based browsers like Edge and Brave. Note that the extension only lets you resolve .crypto, .zil, and .eth websites directly in your Chrome browser.
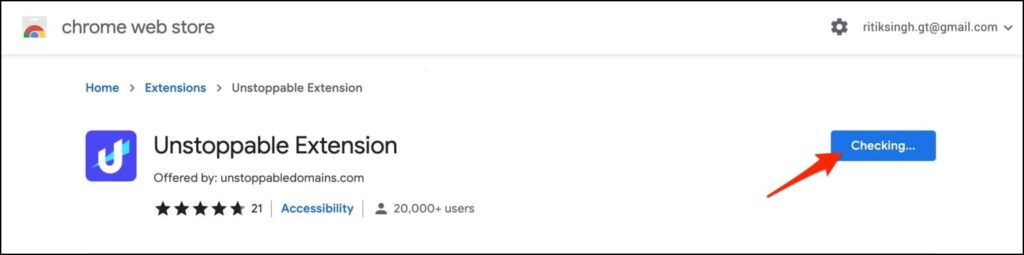
Step 1: Visit the Unstoppable extension page in Chrome Web Store.
Step 2: Click on Add to Chrome > Add to confirm.
Step 3: Once added, try opening a Crypto website. The extension will resolve and open it.
While you create your own Web3 product, you can check out other popular Web3 websites given here.
Wrapping Up
This was all about how you can create and set up your first Web3 crypto website using Unstoppable Domains. I hope this helps crypto and Web 3.0 enthusiasts who want to own or create something in this space. Stay tuned for more content on the new generation web.
